How To Process Credit Card Payments in QuickBooks Online
Tim is a Certified QuickBooks Time (formerly TSheets) Pro, QuickBooks ProAdvisor, and CPA with 25 years of experience. He brings his expertise to Fit Small Business’saccountingcontent.
Mark has researched and reviewed accounting software at Fit Small Business since 2019 and has developed an extensive knowledge of accounting software features and how unique business needs determine the best accounting software.
This article is part of a larger series onAccounting Software.

This tutorial will show you how to process credit card payments in QuickBooks Online using QuickBooks Payments. First, we’ll go over how to set up QuickBooks Payments as you’ll need an account to process payments, then we’ll look at how to record credit card payments using a sales receipt and a customer invoice.
This guide is one of our manyfree QuickBooks Online tutorialsand is designed to help you use QuickBooks Online effectively, ourtop-recommended small business accounting software. To get the most from this, follow along in your account. If you don’t have a subscription, you have two options: a 30-day free trial or 50% off for three months.
How To Set Up QuickBooks Payments in QuickBooks Online
Heads up!
If you already have a QuickBooks Payments account, you can skip this part and jump tohow to record a credit card payment using a sales receipt.
Click on the gear icon in the upper right corner of your QuickBooks Online screen, then selectAccount and settingsunderYour Company, the first column, as shown below.
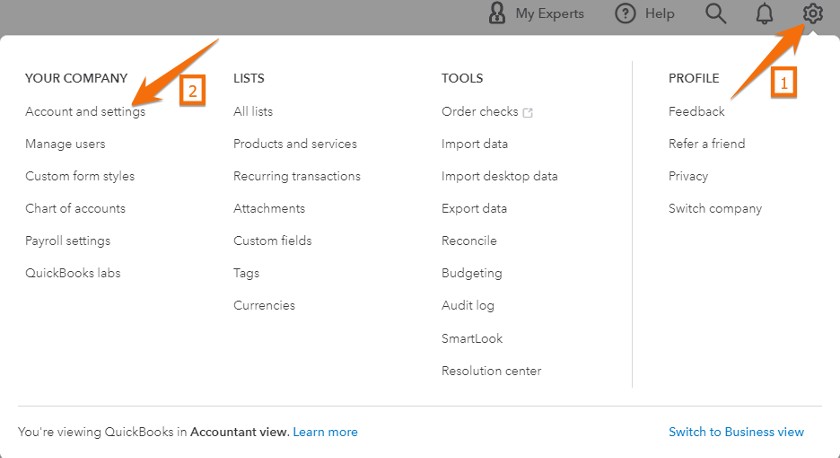
Navigate to Account and settings in QuickBooks Online
From theAccount and Settingsscreen, click onPaymentsin the left menu bar.
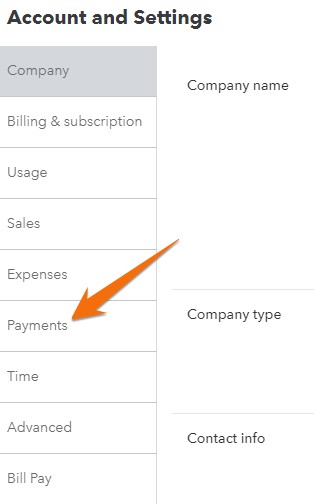
Navigate to Payments settings in QuickBooks Online
If you already have a QuickBooks Payments account, you should proceed to step 3. If you don’t have one, you need to apply for an account by clicking on the greenLearn morebutton in the Payments settings window.
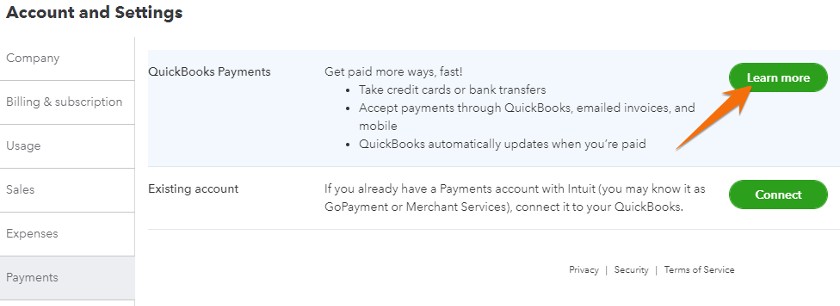
Start a QuickBooks Payments application in QuickBooks Online
After hittingLearn more,你就会被带到accou QuickBooks付款nt application window consisting of three sections, as shown below.
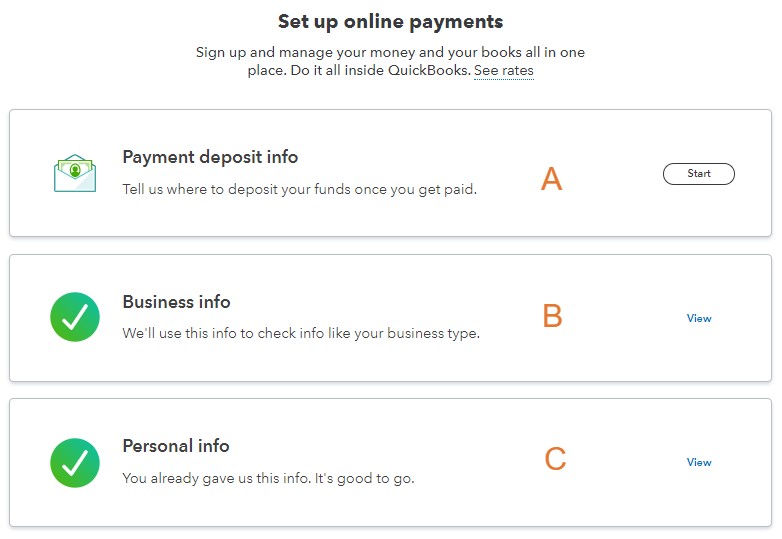
曲ickBooks Payments account application
- Payment deposit info:曲ickBooks will ask which of your bank accounts should receive your credit card deposits and be charged credit card fees. If you haven’t already added a bank account to yourchart of accounts, select a different bank account and hit theAddbutton. When you have selected the account, click the greenSavebutton.
- Business info:You’ll be asked to provide business information, such as company name, business type, and business address.
- Personal info:曲ickBooks will prompt you to provide personal information, including your full name, address, and phone number.
If it is your first time setting up QuickBooks Payments, then you should see a start button next to each section. Otherwise, you should see aViewbutton, just like in the screenshot above (items B and C).
When all three sections are complete, click the greenGet set up buttonat the bottom of the screen (not shown in our image).
Navigate to the payment settings screen as you did in Step 1. Now that you’ve signed up for QuickBooks Payments, your Payment settings screen should look like this:
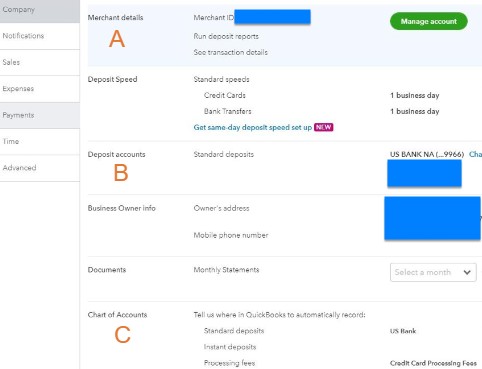
Review payment settings in QuickBooks Online
- Merchant details:Click the greenManage accountbutton to go to your QuickBooks Payments account.
- Deposit accounts:The bank account listed in this section will be used to deposit your credit card proceeds and withdraw processing fees. Changing the bank account here will not affect the QuickBooks account wherein the transactions are recorded.
- Chart of Accounts:This field identifies
- the QuickBooks bank account to record deposits; and
- the QuickBooks expense account to categorize the processing fees.
To designate an account to record processing fees, click anywhere in the Chart of Accounts section.
Next, click on the drop-down menu next toProcessing fees(underCharts of Accounts) and choose an expense account to charge your credit card processing fees. If the account is not yet in QuickBooks, you can create a new account by clicking on+ Add Newfrom the drop-down list that shows up when selecting an account. After selecting an expense account, click the greenSavebutton.
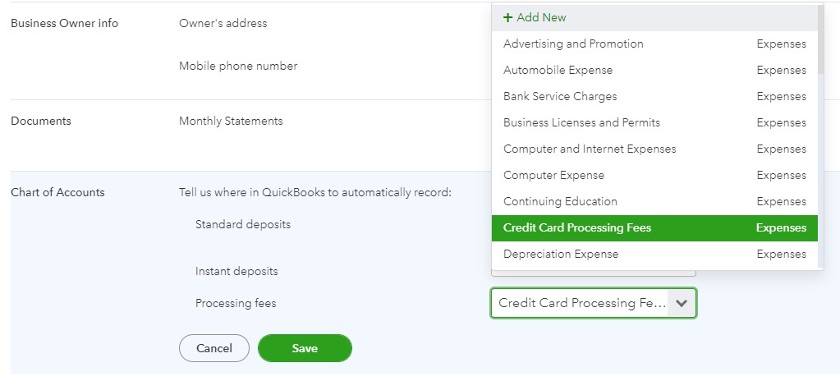
Select an account to record credit card processing fees
How To Record a Credit Card Payment Using a Sales Receipt
You learned how tocreate and send sales receiptsin an earlier tutorial. Now that you have a QuickBooks Payments account, you can issue sales receipts to record customer payments via credit cards, debit cards, and bank transfers.
Click+ Newat the top of the left menu bar and then selectSales receiptunderCustomers,the first column.
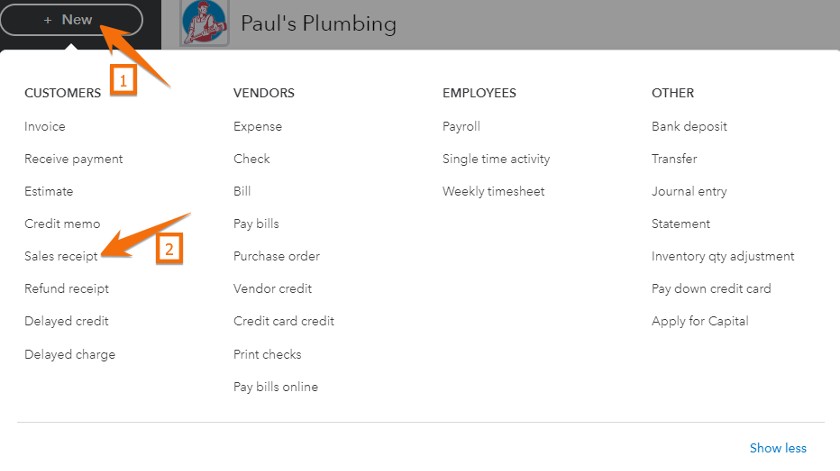
Create a new sales receipt in QuickBooks Online
To accept payment via a credit card, debit card, or bank transfer, click the drop-down box underPayment methodand choose the form of payment.
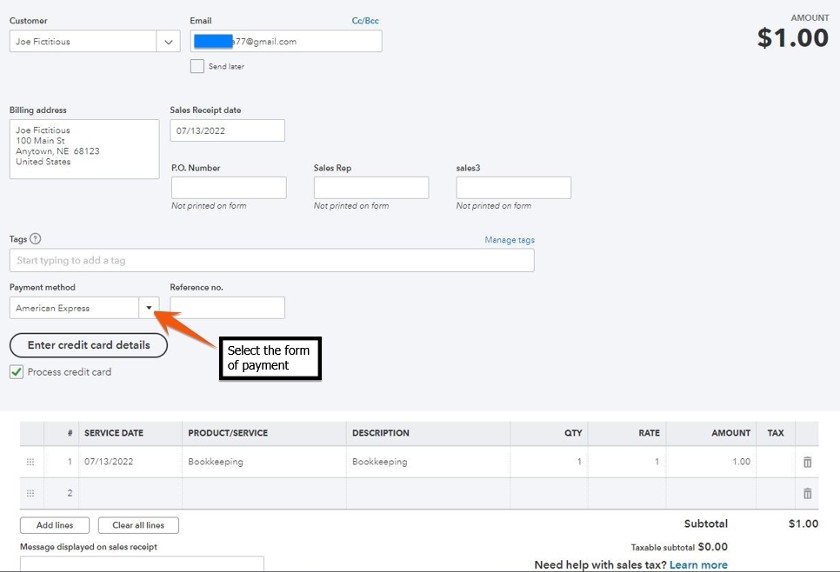
Process credit card payments with sales receipts
After selecting the payment method, click onEnter credit card detailsto input the customer’s credit card account information.
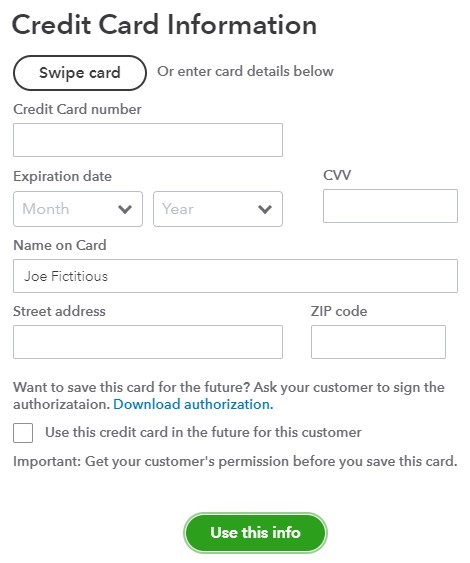
Enter customer credit card information
After inputting all the credit card information, hit the greenUse this infobutton. The credit card transaction hasn’t yet been processed, and you’ll receive a message that you have 10 minutes to process the transaction before the credit card information is removed from the sales receipt. After acknowledging you have 10 minutes, you’ll be redirected to the sales receipt screen.

Sales receipt with credit card information
The Sales Receipt screen now shows the last four digits of the credit card number that will be charged. To process the transaction, click the greenSave and sendbutton.
Reopen the sales receipt by hovering overSalesin the left menu bar, clicking onAll Sales, and then finding the sales receipt transaction you just created. After opening the sales receipt, verify that it reads “Transaction processed” under the Payment method.
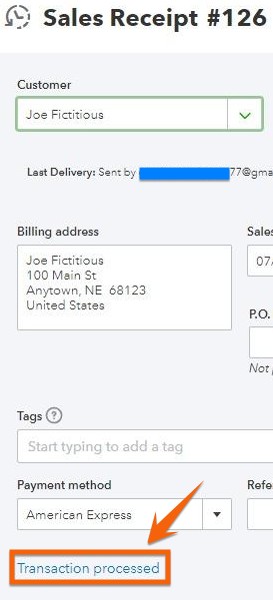
Verify the credit card payment processed on a sales receipt
Click onTransaction processedto view the details of the transaction.
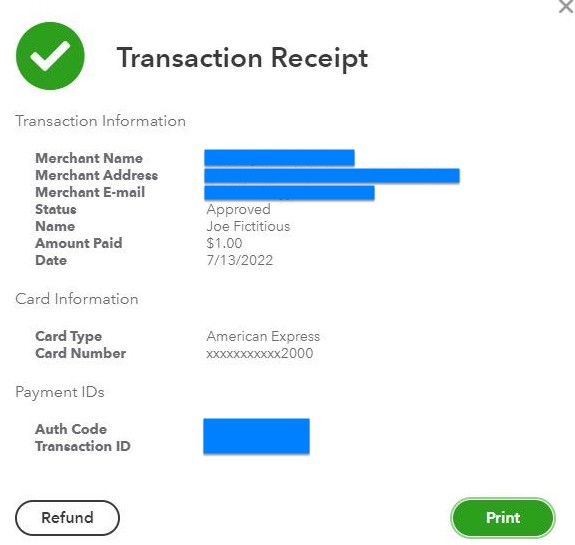
View the credit card transaction receipt
You can either print the transaction details by clicking thePrintbutton or issue a refund to the customer by hitting theRefundbutton.
How To Record a Credit Card Payment on an Invoice
This process is unnecessary if your customer pays an invoice online by clicking Pay Invoice in the email sent to them. You can enable online payments by clicking the gear icon in the upper-right corner of the screen, selecting Company settings in the first column, and then clicking Sales.
Click on+ Newabove the left menu bar and then selectReceive paymentin the first column.
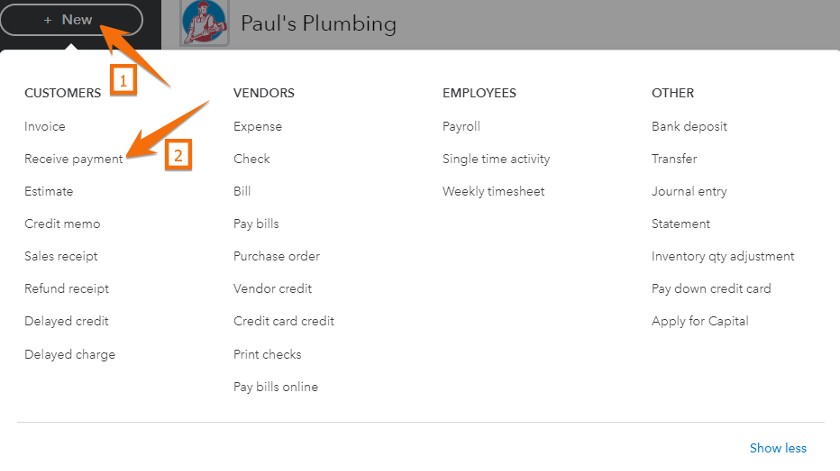
Open the Receive payment screen in QuickBooks Online
The Receive Payment screen should be completed as shown in our guide onhow to receive payments—except the payment method should be changed to a credit card. Click the drop-down menu underPayment methodand select the credit card processor.
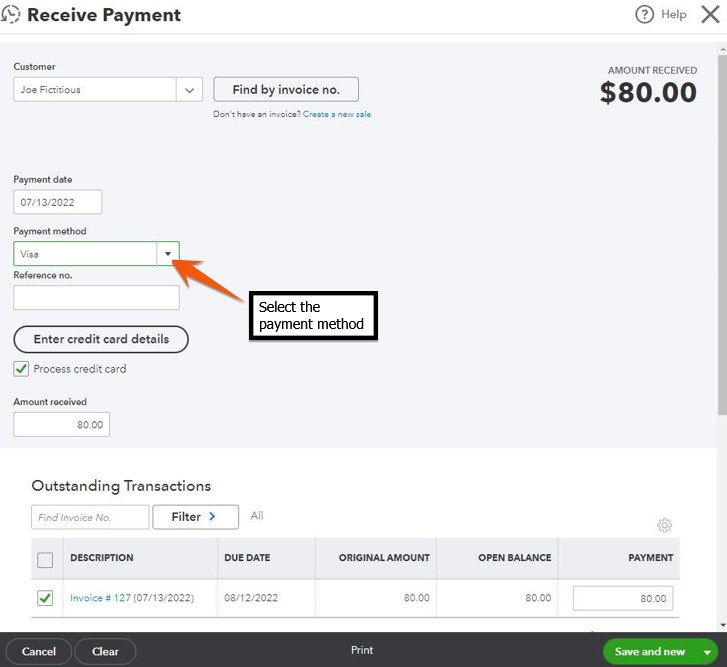
Enter payment method for an invoice payment
ClickEnter credit card detailsto open a window to input the customer’s credit card account information:
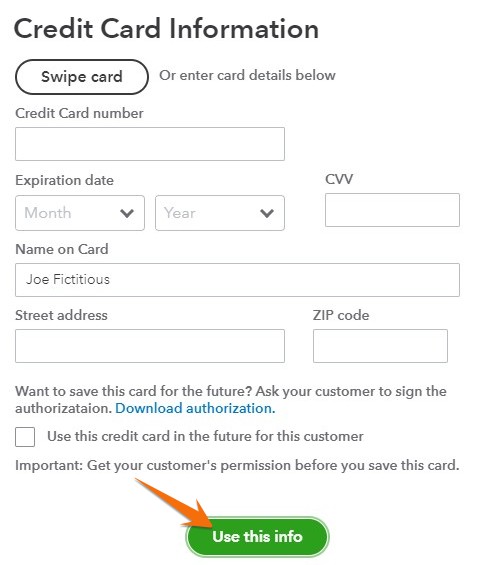
Enter credit card information to receive payment on an invoice
Once the credit card information is entered, click the greenUse this infobutton to continue. The credit card hasn’t yet been charged, and you have 10 minutes to complete the transaction before the credit card information is removed.
The Receive Payment screen will now show the last four numbers of the credit card to be charged.
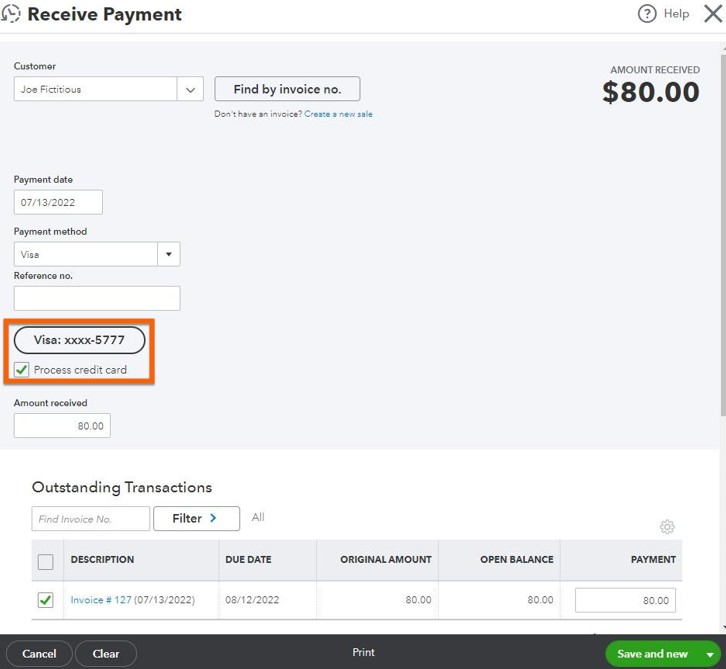
Receive Payment screen with credit card information
Click the greenSave and closebutton to process the credit card transaction and charge your customer’s credit card
What Happens Next
The credit card payments you received won’t be reflected in your bank account register until the funds are transferred from QuickBooks Payments. Once the funds are in your bank, QuickBooks will record the deposits and related processing fees to the account registers you specified in the QuickBooks Payments options discussed above.
What Are the Benefits of Using a QuickBooks Payments Account?
- There’s nothing to install for QuickBooks Payments to work with QuickBooks Online.
- Your accounts and financial statements are always up-to-date since QuickBooks Payments is integrated into QuickBooks.
- Your customers can make payments online by clicking thePay Nowbutton on their emailed invoices.
- You can accept payments using your mobile device via the QuickBooks Online mobile app.
- Payments are deposited to your bank account, on average, within two or three business days after the transaction date.
Wrap Up
Congratulations on completing another QuickBooks course. You just learned how to process credit card payments in QuickBooks Online through QuickBooks Payments. The next guide in our series of free QuickBooks tutorials ishow to record credit card sales with a third-party credit card processor, which will teach you how to enter credit card sales when using a non-QuickBooks-integrated processor.