How To Create Quotes, Bids, and Estimates in QuickBooks Online
Tim is a Certified QuickBooks Time (formerly TSheets) Pro, QuickBooks ProAdvisor, and CPA with 25 years of experience. He brings his expertise to Fit Small Business’saccountingcontent.
Mark has researched and reviewed accounting software at Fit Small Business since 2019 and has developed an extensive knowledge of accounting software features and how unique business needs determine the best accounting software.
This article is part of a larger series onAccounting Software.
In this tutorial, you’ll learn how to create estimates in QuickBooks Online, which you can use to provide quotes and bids to customers for proposed jobs. We’ll also teach you how to send the estimate and track and change its status.
We hope you’ll find this lesson and our otherfree QuickBooks tutorialshelpful for learning how to make the most out of the platform. We recommend that you open your QuickBooks account and follow along with this tutorial step-by-step. If you have no subscription yet, you can choose from a 30-day free trial or 50% off for three months.
Step 1: Navigate to Estimate
Click on the+Newbutton at the top of the left menu bar and then selectEstimatein the first column underCustomers, as shown in the image below.
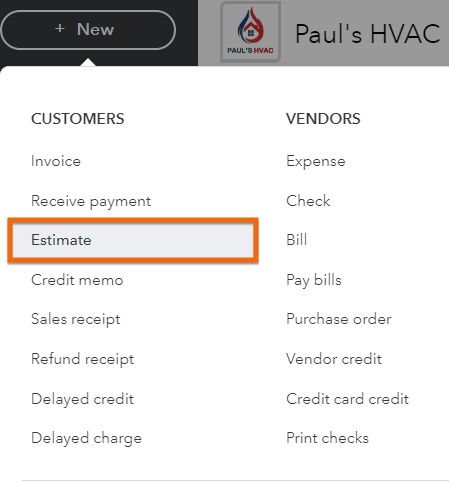
Click on Estimate under the +New button
Seeing a different left-side navigation menu?
QuickBooks has two user views: Business View and Accountant View. Your left-side navigation menu may look different depending on the user view you are in.
If your sidebar menu is not what is shown in our tutorial, it means that you are on Business View. We prefer and recommend using the Accountant View because it shows a full range of business accounting features and tools that you can use in QuickBooks.
To verify whether you’re using the Business View, click on the cog wheel at the top right-hand corner of your QuickBooks dashboard, and check whether the button on the lower right-hand saysSwitch to Accountant view, as shown below. If so, then it means you are on Business View.
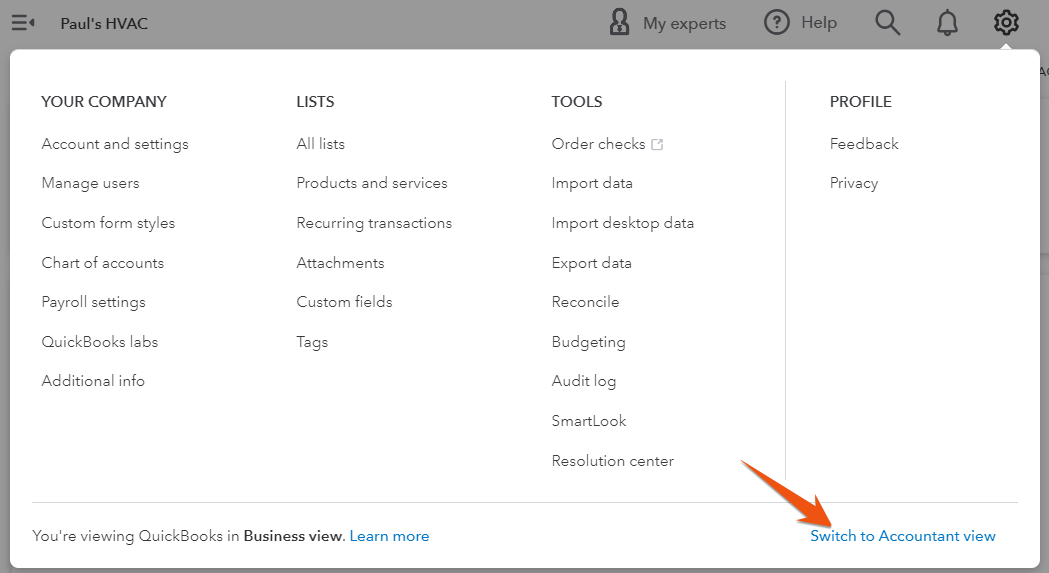
Verify whether you are using Business View or Accountant View in QuickBooks
Once you verify that you are on Business View, click onSwitch to Accountant viewto update the appearance of your sidebar menu. In a few seconds, you should see the same left-side menu bar illustrated in this tutorial.
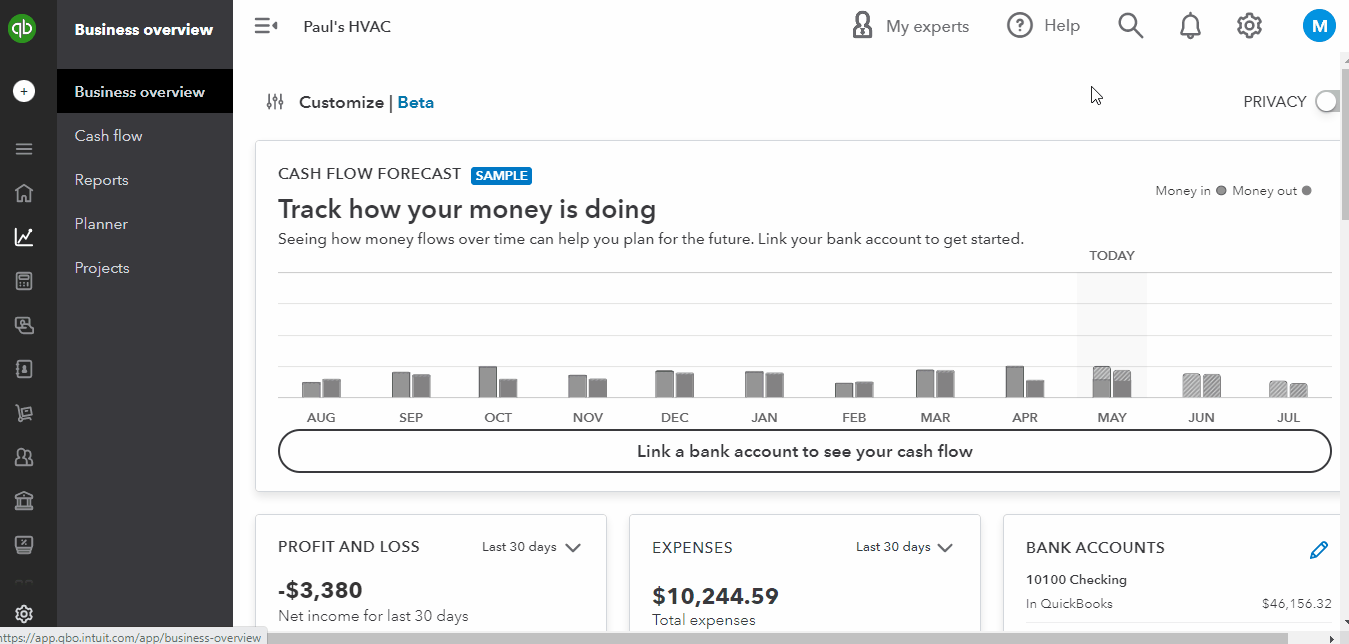
Switching from Business View to Accountant View in QuickBooks
Step 2: Enter the Required Information
After you clickEstimate, you’ll see the estimate form with several fields to complete. The exact fields provided are determined by the sales form settings illustrated in our tutorial on何w to set up sales form content in QuickBooks Online.
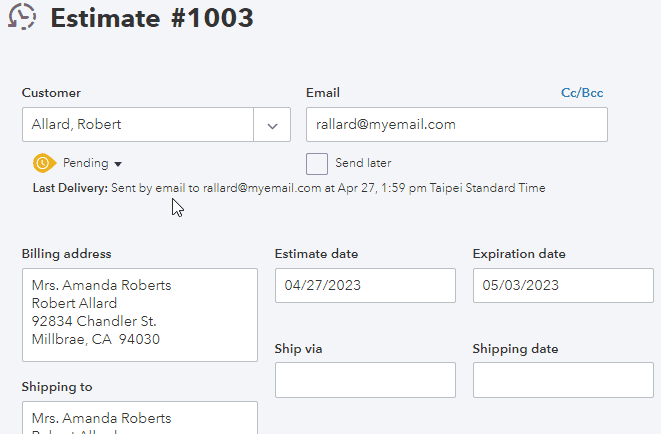
To better guide you in completing the estimate form, let’s record an estimate based on a sample scenario. Paul’s HVAC received a request from customer Robert Allard to install a new air conditioning system in their home. The homeowner has requested a quote for the project, and Paul’s HVAC needs to create an estimate in QuickBooks Online to provide a formal proposal.
The GIF below and the explanations that follow illustrate how to create the estimate for our sample scenario.
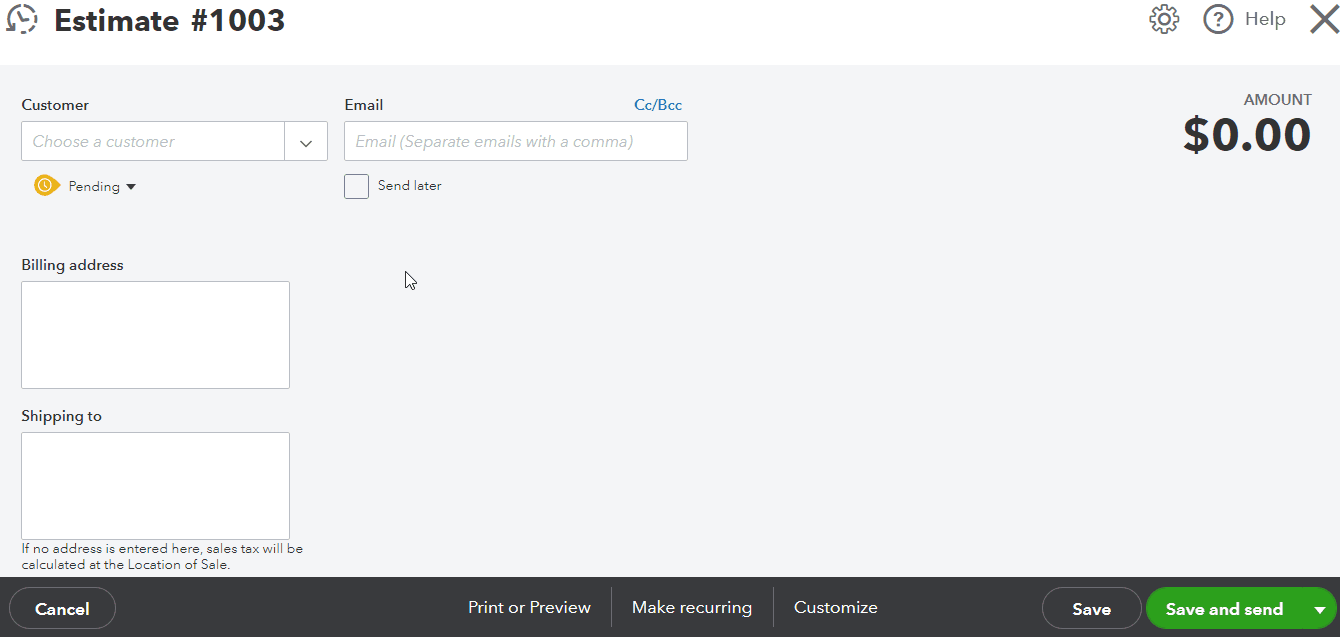
Creating a new estimate in QuickBooks Online
As seen above, we completed several fields, including:
- Customer:Select the customer and job, if applicable. If this is a new customer, selectAdd newat the top of the customer drop-down list, and set up the customer, as shown in our guide on何w to set up customers in QuickBooks Online. When the customer is set up properly, the fields for email, billing address, and shipping should populate automatically. In our sample scenario, we selected Robert Allard.
- Estimate date:Enter the date you’re creating the estimate.
- Expiration date:We highly recommend including an expiration date on your estimate. An expiration date avoids problems that might arise when a customer accepts an estimate months later when the cost of materials may have changed.
- Service date:The service date is when you expect to start working on the job.
- Product/Service:Select the product or service being proposed from the drop-down box. If this is a new product or service, selectAdd newat the top of the drop-down list and set up the product or service, as explained in our guide on如何设置在什么产品和服务列表吗ickBooks Online. When the product or service is set up properly, the Description, Rate, Tax, and Class fields should populate automatically. You may also enter these details manually if needed. In our example, we selected A/C Installation for Product/Service, added a short description (Residential A/C Installation), and entered the quantity (1) and cost which is $3,000. Once the quantity is entered, the Amount should populate automatically as quantity times rate.
Take the time to set up your company.Creating estimates is a great example of why it’s so important to complete your company setup. The majority of the estimate populates automatically if you’ve done the item setup properly in our tutorials on何w to set up customers in QuickBooksand何w to add product/service items in QuickBooks.
Step 3: Save as a Draft or Send Right Away
Once you enter and verify all the information, clickSaveto save the estimate as a draft orSave and Sendif you want to send the estimate right away. You can see what your estimate looks like by clicking onPrint or Preview在底部菜单栏的创建发票window and then selectingPrint or Previewagain, as shown below.

Print or preview an estimate in QuickBooks Online
When you opt to clickSave and Send, an email template form will open. This is where you can accept the email defaults that you set up in our tutorial on何w to set up messages in QuickBooks Online—or you can type a custom message for this estimate. A copy of the estimate will be attached to the email automatically when you click the greenSend and closebutton.
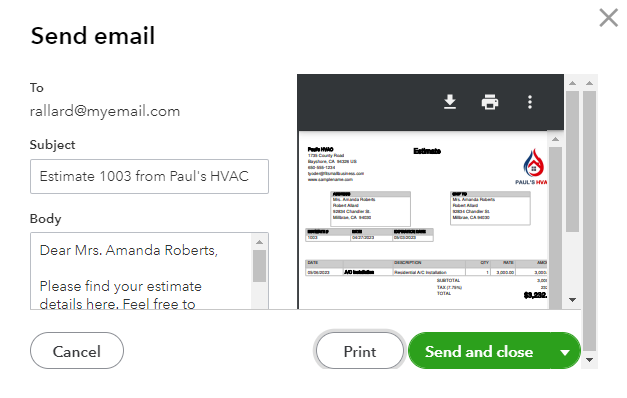
An email template form appears after you click Save and Send
If you wish to make changes to the estimate, you may close the print preview window to return to the input screen. Below is a sample estimate that we created for our fictitious company, Paul’s HVAC.
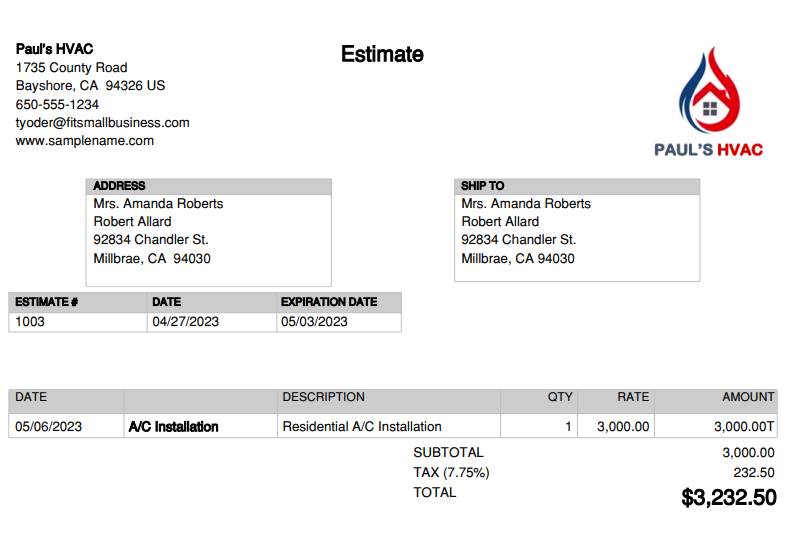
Sample estimate created in QuickBooks Online
Track & Change Estimate Status in QuickBooks Online
After sending the estimate to a customer or potential customer, you can track and change its status in QuickBooks Online. To do this, clickSalesfrom the left navigation menu and selectEstimates.
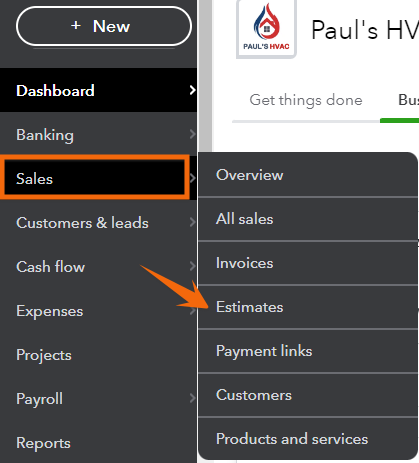
Navigate to Estimates
Locate the estimate you wish to update and clickMark acceptedunder theActioncolumn. You may also click anywhere on the grayed entry line and tap the Edit button (not shown below), to open the estimate screen.
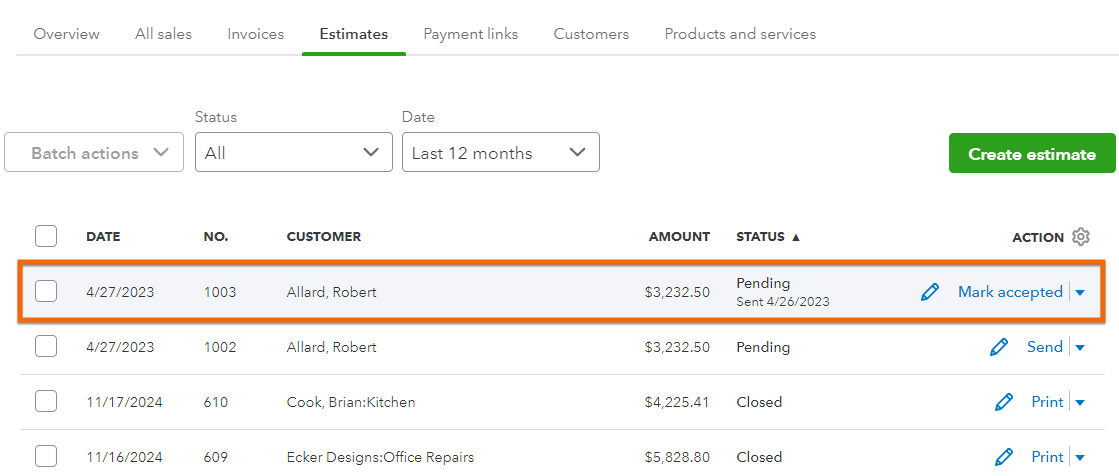
Estimate list in QuickBooks Online
In the screenshot above, we can see that the estimate we sent to Robert Allard has the status “Pending.” He has agreed to proceed with the A/C installation service, so let’s update the estimate status.
You’ll find the estimate status below the customer field on the estimate form. Click on the drop-down arrow next toPendingto change the estimate status. You can choose from four statuses to help track your outstanding estimates:
- Pending:An estimate is pending after it’s sent to a potential customer until the customer accepts or rejects the estimate or the estimate expires.
- Accepted:Accepted estimates have been approved by the customer, and a signed copy of the estimate has been received.
- Closed:QuickBooks will change the status of an estimate automatically to closed when the estimate is converted to an invoice.
- Rejected:If a client informs you that they aren’t accepting your estimate or the expiration date of the estimate expires, you should change the status of the estimate to rejected.
When updating an estimate status, you will be prompted to enter the name of the person who accepted the estimate and the date on which it was accepted, closed, or rejected.
Updating estimate status in QuickBooks
Note that there are several reasons why you need to update the estimate statuses in QuickBooks Online in addition to keeping track of the project’s progress. If you leave the estimate pending, it will be excluded from some important reports.
For example, the new version of QuickBooks Advanced now allows you to create a project estimate vs actual report and only estimates that are accepted or closed can be included in the report. Also, you can’t convert an estimate into an invoice unless it’s marked accepted or closed.
Why You Should Create Estimates in QuickBooks Online
- Easy estimate creation:As ourbest small business accounting software, QuickBooks Online has a user-friendly interface that makes it easy to create and manage estimates.
- Streamlined status tracking:You can track the status of your estimates easily, so you always know whether they have been accepted, declined, or are still pending.
- Customization:Your estimate can be customized to include specific fields that are relevant to your business.
- Reporting:You can run reports in QuickBooks that will help you compare your estimates to actual income and costs after the work is completed.
Frequently Asked Questions (FAQs)
Yes, and you can learn how through our guide on何w to create and send invoices in QuickBooks, which also discusses how to convert estimates into invoices.
Yes, you can customize your sales forms, including estimates. Head to our tutorial on何w to set up sales form content in QuickBooksfor more information.
Wrap Up
You’ve now learned how to create estimates in QuickBooks Online. You can now also mail or email them to prospective customers. The next lesson in our training course is何w to create and send Invoices in QuickBooks Online.