How to Take Quality Product Photos at Home in 7 Easy Steps
This article is part of a larger series onRetail Management.
Product photos might be the most important piece of any ecommerce listing. They convey everything from physical specs to emotional attributes. Plus, photo quality directly correlates to perceived value.
High-quality product photography can be done on a budget using your iPhone or camera with equipment and materials you may already have around the house. Here’s how beginners can take beautiful product photos that sell in six easy steps.

Step 1: Choose the Type of Photos You’re Shooting
Without the opportunity to touch, feel, and experience the product in person before buying, online consumers rely on product photos to thoroughly inform them.
While a simple shot of the product against a clean white background can say a lot, it leaves room for questions. How big is the item? How do you use it? How will it make the user feel?
This information can be provided through differenttypesof product photos. It’s recommended that you upload as many pictures as it takes to showcase every major detail of your product, which usually means four to 12 images. The majority of these should be simple and informative with a plain, non-distracting background, plus a few dynamic shots that demonstrate the real-world glory of the item.
Here are the seven main types of product photography shots and how to incorporate them:
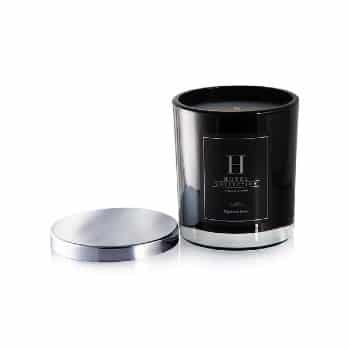
Source: Hotel Collection
Studio shots, also called individual shots, provide a basic look at the product by itself against a clean, minimalist background.
Their purpose is to clearly and attractively display the item, often from multiple angles. Most studio shots feature a white backdrop, but alternative options like wood, grass, or stone can brand your images and help convey emotional product attributes.
This type of photo is a must-have for any product in every category. Aim to have three to eight studio shots in your listing.
TheSquare Photo Studio appautomatically isolates your product from the background—creating clean, crisp studio shots without a physical studio.
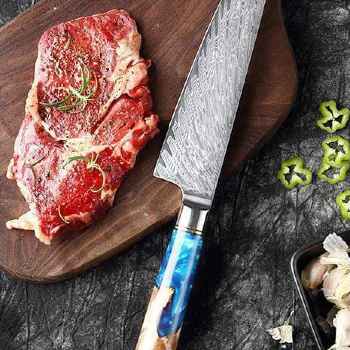
(Source: Kutara)
A lifestyle or “in-context” shot shows the product being used, worn, or otherwise displayed in its natural habitat.
这些照片让客户想象甲型肝炎ing the product in their life would mean for them. They connect with the audience on an emotional and practical level and encourage the customer to relate the item to their existing preferences, hobbies, interests, or aspirations.
Lifestyle shots are highly beneficial for nearly any product in every category and can supplement or replace some studio shots in your product’s gallery. Include at least a couple of dynamic, in-context images among other simpler photos.
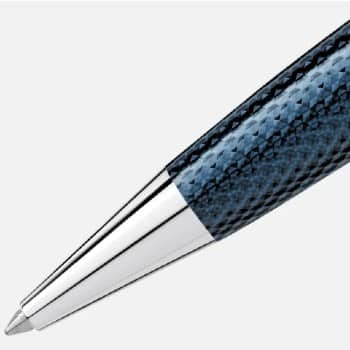
(Source: Montblanc)
Detail shots, also called macro images, present an up-close view of the product, often focusing on a specific characteristic.
They serve to provide further information about how the product looks and what it’s made of, as well as showcase special features or indications of quality.
These shots are helpful for many types of products but may not apply to every category. Even if your item doesn’t have a purposeful detail to show off (like the machined finish on the barrel of the pen shown above), try to include at least one macro shot to help the customer feel like they’re viewing the item in person by offering a rich visual description of textures and materials.

(Source: Chewy)
A scale shot demonstrates the size of a product and can be accomplished in multiple ways.
Some photographers will include a well-known, recognizable object next to the item that they’re shooting for scale (like a soda can or a gift card).
A more elegant way to convey size is to display the product relative to its environment—like the scratcher-toy shown above, complete with a cat on top of it.
Relative size is usually a vital piece of info for customers to have, but in some cases, the size of a product is either implied or irrelevant. If your buyers would benefit from a scale shot, aim to include just one or two in your item’s gallery.
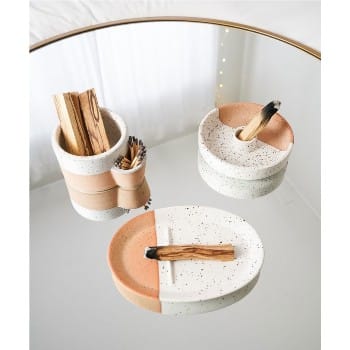
(Source: Bursera)
Group shots display multiple related items together in one scene. These setups have a few applications that serve slightly different purposes.
A group shot can be used to recommend buying other items in a collection by presenting them together, as is done with the chic ceramic incense burners pictured above.
It can also be used to showcase multiple variations of the same product like jewelry in white, rose, and yellow gold options, or a blush powder in every available shade.
组照片是用另一个方法是示威te what a purchased set of goods looks like by presenting them together, like a set of four dinner plates or an assortment of gel pens.
This style of shot is great for nearly any product that is offered in variations or as part of a full collection. Adding one to three group photos to your product listing will help viewers get a more complete feel of the product and their options.
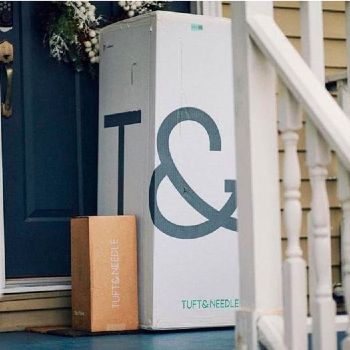
(Source: Tuft & Needle)
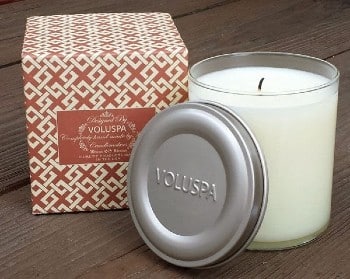
Packaging shots demonstrate how the product is, of course, packaged.
While this counts as a frivolous detail for many products, packaging is a large contributor to branding and even sales for plenty of goods. In the example used above, a mattress and pillow set are pictured as they arrive on the buyer’s doorstep. The product’s compact and manageable packaging is a big selling point for the brand, so it makes sense to photograph it.
Incorporating packaging shots is a good idea for items that have unique packaging elements or will likely be sent as a gift. One or two photos of the product’s outer appeal is plenty for a product listing, but they’re also great promotional tools to use around key holidays.

(Source: Novica)
A process shot provides insight into how the product was made.
These images emphasize authenticity and craftsmanship and are helpful selling tools for handmade or artisanal products. They promote an emotional connection with the item as well as its origin and allow your brand to build trust as it connects with your audience.
One or two process shots will augment a product listing, but they’re also useful for social media posts and advertisements.
The right combination of these photo types will give your customers the information and encouragement they need to confidently make a purchase.
Shooting multiple styles of shots in different environments requires making adjustments to your setup and sometimes procuring different equipment, so it’s wise to plan your gallery before getting started.
Did you know?
Certain marketplaces have rules concerning what is allowed in listing photos hosted on their platform.Amazon, for example, prohibits close-up detail shots and prefers that sellers use a pure white background. Be sure to know any applicable guidelines before shooting to maximize your usable images.
Step 2: Set Up Your Photo Studio
Taking great product photos doesn’t require a high-budget, professional setup—but you’ll need some things other than your camera or phone.
Depending on your desired shot and available environment, you may need nothing more than a park bench and the right weather. Other circumstances, however, call for a more complete toolbox.
As an alternative, you can eliminate the need for your own photo studio by using theSquare Photo Studio App. It has built-in tools to achieve the perfect angle, lighting, background, and more.

Source: Square
Here are the basics of a DIY photo studio:
You’ll need a flat platform large enough to easily display the product—this can be your dining table, your desk, a TV tray, a chair, or another similar surface. If you decide to shoot outdoors, make sure your shooting table is portable.
You can also purchase a dedicated photography table with a built-in sweep (covered in the next tab) for $50–$125, likethis economical option. Portability, durability, and convenience are the main benefits of buying this gear, but DIY emulations can work just as well.
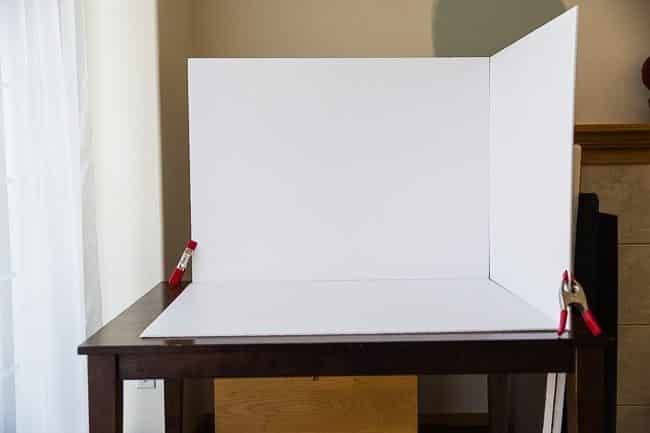
Asweeporinfinity curveis a seamless backdrop that smoothly transitions from the horizontal to vertical surfaces in your shot. It creates a distraction-free, shadowless background to let your product take center stage.

(Source: FIWIST Photography)
The size of the sweep you’ll need depends on the size of your product (and any other subjects to be featured in your shots). When working with small goods,poster boardsorfoam sheetsmake effective sweeps. Larger products call for a larger setup, which can be made fromfabricorpurchased inexpensively.
To assemble your own sweep, first suspend the top of your poster board (or other material) above the back of your shooting table. If the surface is pushed up against a wall, you can use a temporary adhesive to hang it. Otherwise, construct a stand to attach it to by setting up scrap wood supports on your table or placing a coat rack or ladder behind it.
Secure the sweep to your support withclampsor tape, then drape the material down over the top of your shooting table.
In lieu of a sweep, you can arrange material on your shooting table that is congruent with your brand and complements the look of your item. Attractive background ideas include stone, wood, marble, tile, decorative pillows, grass, and plant life.
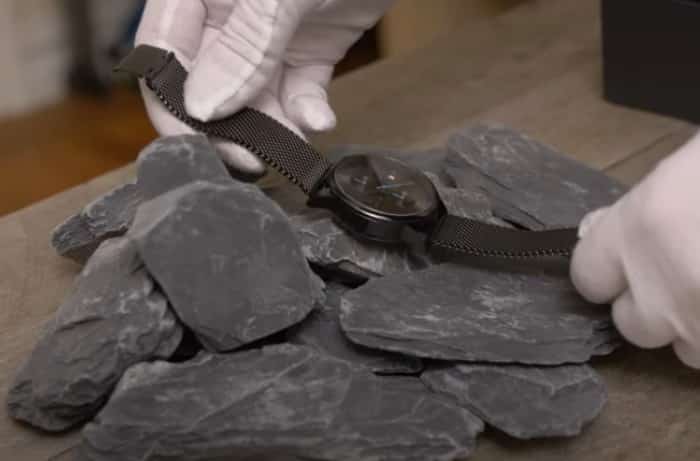
A photographer from B&H Photo Video uses pieces of slate as a simple and masculine background for a watch.
Keep in mind that, depending on your setup, this type of backdrop will likely limit the angles you can use to capture an attractive shot.
In the best-case DIY scenario, you won’t need to buy or use any studio lights. Working withnatural lightis much easier and more forgiving and leads to better results.
Artificial lightingdoesprovide more flexibility and convenience, though, especially if you don’t have the proper weather, windows, or daily schedule to capture any sun.
If you opt for artificial lighting, seek5000K daylight/cool white LED bulbsto provide a glow that’s very close to natural light. Many household bulbs create warm white light, which casts a red-orange tint in photos, while most fluorescent lights cast a greenish hue. Plenty of inexpensive LED options areavailable online.
To use your bulbs on your set, cost-effectiveclamp lamps将任何方便的家庭对象是完美的吗into a stand. If you’re shooting often or in many different areas, you might find it easier to purchase tripod stand lights or an entirestudio lighting kit.
For both artificial and natural light sources, reflectors are used to mitigate unexpected color variations and contrasts in photos. They also allow you to manipulate and evenly distribute light and shadows, which can make a world of difference in product photography.
Small, portable reflectors are availablefrom about $15, but simple white foam boards are highly effective as well.

Reflectors should be positioned to bounce light onto dark or shadowed sides of the subject.
Keeping your camera or smartphone as stable as possible produces consistently crisp, clear photos. Shooting by hand works, but it may lead to blurry or out-of-focus images.
It’s possible to stabilize your device by setting it on an object of the appropriate height—like a stack of books or a piece of furniture. To keep your phone steady in the right position, DIY mounts can be made using nearly any household object, like the examples shown below.
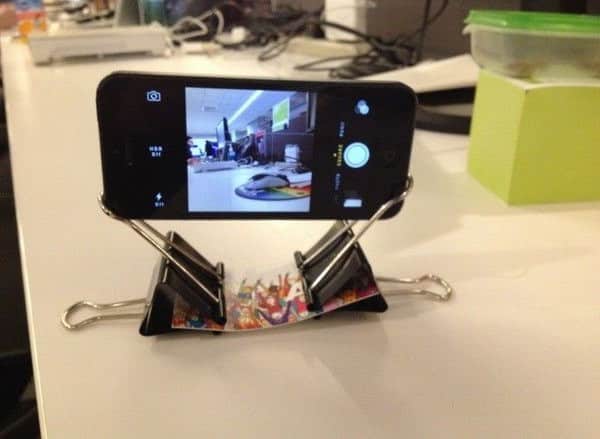
Fastening two binder clips to a strip of paper creates a simple and effective phone stand.
(Source: FixThePhoto)

A disposable cup can be easily cut to position and hold a smartphone.
(Source: CNET)
If you choose to invest in a proper tripod, they’re cheaply available for bothdigital camerasandsmartphones.
Product stands or risers help to lift items off your table to reduce hard shadows at the base. They’re also great for staging product assortments, group shots, or incorporating decorative props.
Risers可以通过覆盖的项目,喜欢盒子吗or storage containers, in cloth. They can be the same color as your sweep in order to blend in or to add a pop of attractive color or pattern.
Some products look best when arranged or positioned in a certain way, which is wheresupportscome in. Fishing line tied to a simple rod can be suspended about your setup to lift or hold parts of the item in place, like the handle of the purse shown below. Small picture display easels can prop or stand items upright, andglue dotsare a popular choice among photographers for keeping everything securely in place.
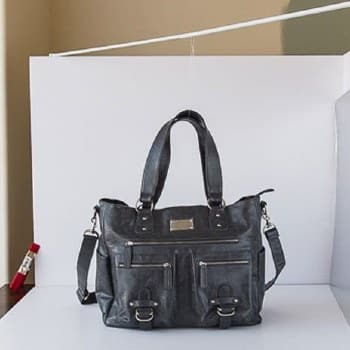
The handle of this purse is held in place by fishing line tied to a suspended rod. (Source: SLR Lounge)
Ask any professional and they’ll tell you that you canneverbe over-prepared for a shoot. It’s wise to keep little amenities readily on hand, like a pen and paper, extra tape, safety pins, scissors, and spare batteries (or a charger for your phone).
Take your at-home studio a step further by styling your set with props:
Though a standard, white-background studio shot is the product photography go-to, adding some panache to your scenes can help convey emotional attributes of your goods.
Try incorporating props that align with your brand, appeal to your audience, fit in with the scale of your subject, and tell your product’s story.

Items used in manufacturing make compelling props for product photos. (Source: FixThePhoto)
With all of your equipment in tow, you just need to find the right space. As long as your studio area is large enough to house your gear and subject with enough room to maneuver around it, the only real consideration islight.
Our next step addresses how to choose the right spot to stage your shoot and make the most of the light it gets.
Step 3: Master Your Lighting
Lighting is key to taking great photos with any camera. Here are some tips to make the most of the light you have available.
Shoot Outside for Soft, Natural Light
This is atopproduct photography tip—A wash of soft, natural light provides the best color balance for product photos and minimizes harsh shadows.
You can find the perfect light outdoors on an overcast day (when the clouds serve to diffuse the sunlight nicely), or at midmorning and early evening (when the light strikes from a smaller angle).
The unedited product photo below was taken on an outdoor picnic table during an overcast day. This shot was captured using a Samsung Galaxy smartphone on its automatic setting with no additional equipment, and it’s virtually perfect for a product listing.
(Source: Krista Fabregas for Fit Small Business)
Use Natural Light From a Large Window or Glass Door
If shooting outside isn’t possible or convenient, try the next best thing—setting upindoorsnext to a large window or glass door.
By arranging your shooting table next to a bright natural source, you can still capture plenty of light. It may need to be manipulated for your subject to be lit evenly without harsh shadows, so be sure to have reflectors on hand.
Setting up a few pieces of foam board reflectors can make a great window-side stage for your product, like the example shown below.
Source: SLR Lounge
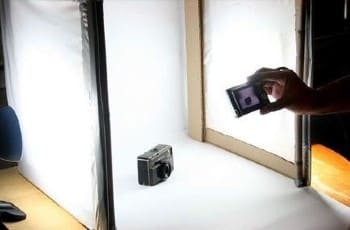
Create Diffused Light Indoors
If the perfect natural light isn’t accessible, you can mimic it in a number of ways. The key is to diffuse—meaning to spread out and soften—the light. This minimizes shadows and enhances colors in product photography.
For small items, you can do this by using a device called a tabletoplight tentorlight box. They’re available to purchasestarting at under $20and come complete with rudimentary lights.
Of course, you can build one yourself using basic household materials, but you’ll need to supply your own studio lights.Here’s a detailed guideto construct your own DIY light box.
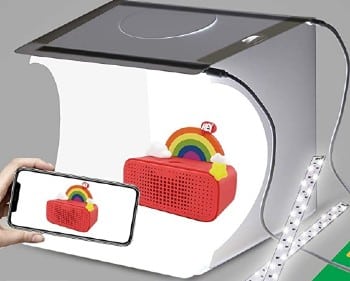
(Sources: Left – wikiHow Right – Amazon)
For a simpler DIY approach, the pros atB&H Photo Videorecommend wrapping paper towels around a picture frame and holding or securing it to your light as a diffuser. This works effectively for products too large to easily fit in a standard light box and can be done with white paper or fabric and clamps, as well.
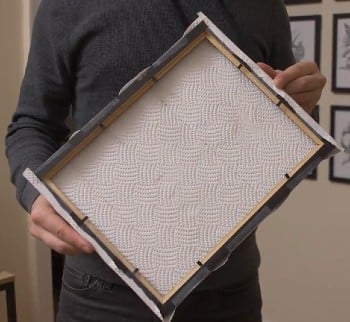
This simple DIY diffuser is great for larger products. (Source: B&H Photo Video)
Let More Light in With a Tripod
When you’re running low on natural light but don’t have viable studio lighting, stabilization makes it easy to capture crisp, detailed product shots without a flash. This can be accomplished with a tripod or a DIY stabilizing mount.
Using a device’s flash alters colors, disrupts the background, and casts hard shadows—but with enough stability, you can increase the exposure time instead (which is a setting we’ll discuss later in this guide). This allows more of the available light to enter the shot over a slightly longer period.
另外你可以设置使用三脚架the shutter delay so that your device takes the picture a few seconds after you touch the screen. This ensures sharp, in-focus images every time.
Step 4: Adjust Your Camera
Great product photos can be taken with almost any modern device you have on hand (or can borrow from a friend)—whether it’s a digital camera or your iPhone or Android.
If you’ve followed the lighting tips from earlier, both device options can be used on their automatic, point-and-shoot settings to easily yield usable shots.
If your lighting situation is less than ideal or you want to fine-tune your photos, you can adjust the image attributes by trying new settings or switching your device to manual mode. Here’s a look at how it’s done.
Most modern phone cameras have a variety of automatic options to help refine your shots based on the scene. When shooting product images, it’s helpful to try a few different settings to see what produces the best look. Here are some of the options your phone likely has:
- Macro/Detail:This setting is useful for creating images that capture close details in focus while blurring the background. They provide a professional look for your detail shots and keep the viewer’s attention on the product.
- Portrait:Some phones have to detect a human face in the frame in order to take a picture in portrait mode, so its use in product photography is limited. If your device allows for it, this setting can take attractive shots of an object by adjusting the camera’s aperture to soften the background.
- Daytime/Outdoor:These settings optimize light and white balance when shooting outdoors or in bright natural light.
- Night:This mode creates a slower exposure to capture more light. When used with a tripod or other stabilized setup, it can help take crisp product shots indoors.
- HDR (High Dynamic Range):This option enhances the lightest and darkest parts of your image while balancing colors. It’s best suited for shooting outdoors, or any scene with a wide range of color attributes. Processing time is increased when shooting in this mode, so it’s important to keep your device stable.
- Focus:Most phone cameras have an auto-focus feature that’s activated by tapping the desired focal point. The result will be a crisp, in-focus image for your web store.
Even with these numerous automatic options, it’s often hard to capture the perfect shot without manually adjusting your device’s settings.
To enter manual mode on a digital camera, switch the mode dial to “M”, as shown below.

Source: IFB Media
If you’re using a smartphone, look for the Manual or “PRO” mode option in the camera settings.
Entering PRO mode from the standard camera app on a Samsung Galaxy A32
With either type of device, here are the main settings you’ll want to adjust when shooting manually:
ISO
ISO (which represents the International Organization of Standardization), is a rating that refers to a camera’s sensitivity to light. Its range varies depending on your camera, and the value you set controls the camera’s internal sensor.
A standard ISO range is 200 to 1600, but top-of-the-line models can go as low as 50 and as high as 3 million. The higher the value, the more sensitive to light your camera will be, and the brighter the scene will appear.
As a general rule, aim to keep your ISO as low as possible. Higher ISO settings result in grainy or “noisy” photos, which compromises image quality.
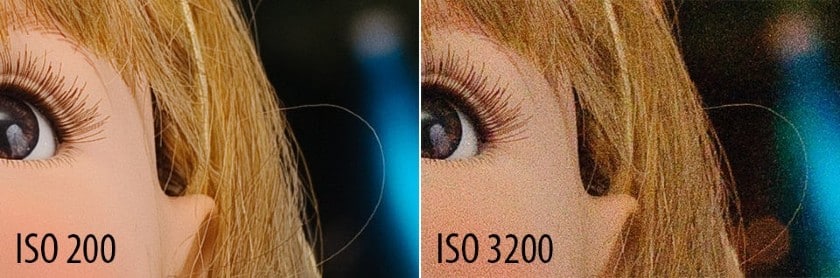
These images of the same scene, captured with both a low and high ISO setting, feature drastically different levels of “noise”, or grainy distortions.
(Source: Photography Life)
Aperture
Aperture is the size of the opening of your camera’s lens diaphragm. It’s calibrated in “f-stops” and a basic modern camera lens has a range of about f/2 to f/38 (but it varies depending on lens model).
For this setting, thesmallerthe f-stop value, the bigger the lens’ opening will be—which allows formorelight to be captured. Conversely, alargef-stop creates a small opening, and allows forlesslight in your image.
Although it has this effect on light and exposure, aperture is most commonly used to controldepth of field.
Depth of field (DOF):The distance between the nearest and furthest objects in an image that appear acceptably sharp or in-focus.
A high f-stop number results in a large (or “deep”) DOF, so the image presents crisp focus on everything from foreground to background. This adjustment is great for landscape photography, large group portraits, or certain product photography lifestyle shots.
Lower f-stop values produce a smaller (or “shallow”) DOF, which blurs the background while keeping your subject in sharp focus. These settings are ideal for individual portraits and many types of product photos.
Different values of this setting will have their place in different shots that you’ll take, butstart by trying an aperture between f/4.5 and f/7.1 for your product photos.This range allows the subject to stand out by slightly blurring the background while retaining the sharpness you need to convey details.
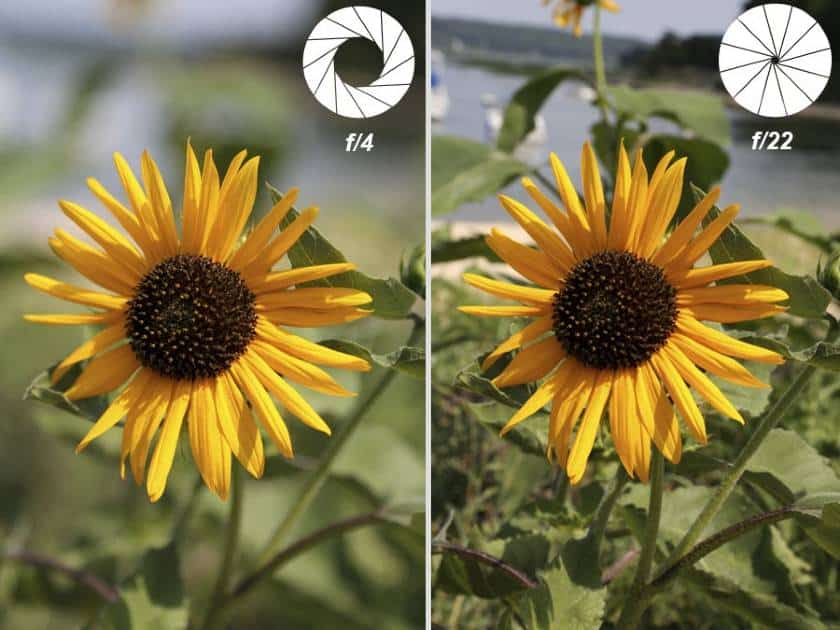
同一场景高低apertu捕获re features different depths of field, providing a unique look to each image. (Source: Canon USA)
Shutter Speed
Shutter speed is the length of time that the digital sensor (or film) inside your camera is exposed to light. It’s measured in seconds, and most commonly represented as fractions of a second. Your camera can likely be adjusted from a shutter speed of 1/4000 to 30, but another manual option—called “bulb” mode—can be used to leave the shutter open as long as you want.
这个设置会影响the brightness of your image by controlling the amount of light that reaches the sensor. A slower shutter speed yields a brighter photo, whereas a faster shutter speed creates a darker one.
It also changes the way thatmotionis captured in your pictures. If there is any movement in your scene, a slower shutter speed will let the sensor absorb more of its range, creating a “blur” effect. A fast shutter speed, on the other hand, will appear to “freeze” motion.
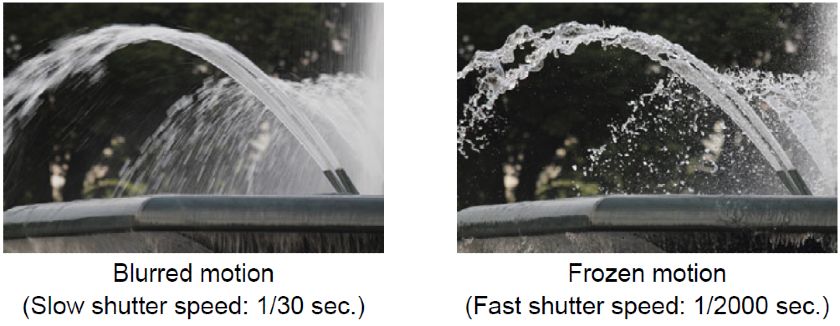
The photographer was able to capture blurred motion of this fountain by using a slow shutter speed and “freeze” the water’s motion with a fast shutter speed. (Source: Canon USA)
White Balance (or WB)
This setting adjusts thecolortemperatureof the scene you’re shooting. Color temperature is a value measured in Kelvins (K), which is a physical property of light. It ranges from warmer, orange tones at 1,000 K to bluer, cooler tones at 10,000 K.
Direct sunlight at noon is the benchmark for neutral color temperature, and it clocks in at 5,200-6,000 K. You might not notice it (thanks to your brain’s ability to perform a white balance of its own), but all other light sources impose a warm or cool hue onto the surfaces they hit.

A chart of the color temperature-value of common lighting conditions. (Source: Photography Life)
Your camera’s white balance features add the opposite color to the image to neutralize the scene’s color temperature.
The default auto WB setting (labeled as A on your device’s WB menu) does a good job of detecting the scene’s K value and compensating to achieve attractive, neutral tones. It’s a popular choice among professional photographers and often the best place to start.
Your camera likely has other WB presets designed for specific lighting conditions, like Cloudy, Shade, Fluorescent, and Incandescent. It also allows you to manually select the K value of your shot, typically from 2,500 to 10,000.
Regardless of the white balance option you choose, it’s important to get photos with a neutral, true-to-life hue. Adjusting your lighting and settings is the best way to achieve this, but color temperature can also be reworked during editing.
These values work together to create a photo that is perfectlyexposed.

“The Exposure Triangle” is a visual demonstration of the relationship between aperture, ISO, and shutter speed. All three settings work together to achieve a balanced, well-lit photograph.
Step 5: Take Photos of Your Product
With your studio, lighting, and device settings in order, it’s time to shoot.
Have your products arranged on your set or shooting table using the stands and supports you produced for your studio. Consider attractive ways to represent how the product looks in action, like removing the lid from a jar of skin cream and propping it up against the item’s side (as shown below).
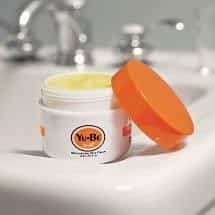
(Source: Yu-Be)
Take plenty of test shots to determine the best equipment arrangement and settings for your available lighting. Once you find a setup you’re confident in, focus on capturing the best and most important attributes of the product.
If you’re taking simple, standard studio shots, this step is relatively straightforward. Aim for photos that clearly and attractively present the item front-and-center and be sure to get pictures displaying it arranged in multiple ways. Capture any and every detail that may be relevant to your buyer.

This photo gallery features studio shots from a wide range of angles that give the shoppers lots of helpful information. (Source: Amazon)
Try to include a number of photos taken at a 45 degree angle. This viewpoint mimics how the customer would encounter items in a brick-and-mortar store, allowing for a more personal experience.
If your goal is to take more visually stimulating photos, here are some effective and creative composition techniques to try out:
三分法是一种可靠的摄影standard, and it can be used to provide an alluring look for your product photos without straying too far from simplicity.
It works by moving your subject away from the middle of the frame and placing it at the intersection of two imaginary horizontal and vertical lines. This creates a more compelling and natural feel to the arrangement.
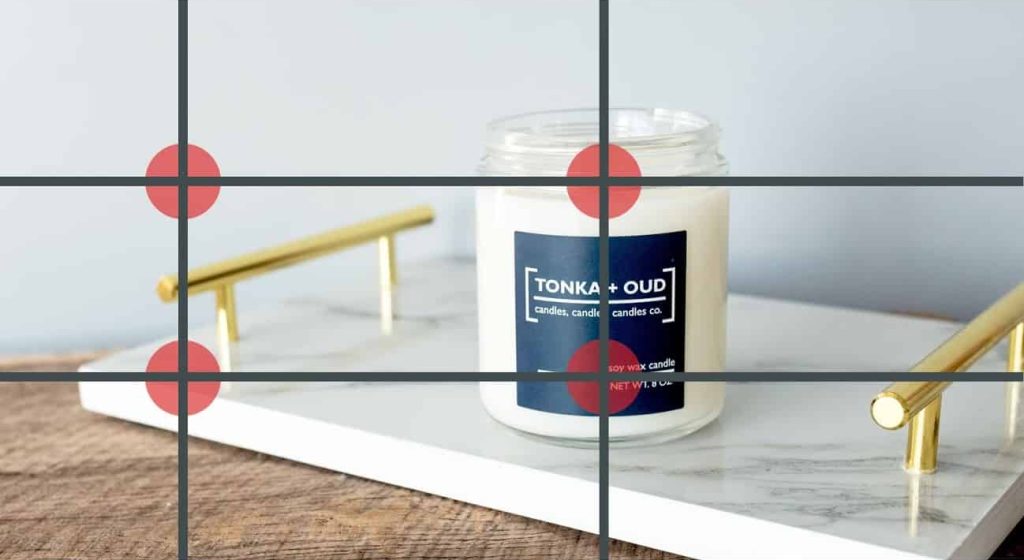
(Source: CandleScience)
The rule of odds states that your composition will be more appealing and dynamic if its elements are arranged in odd numbers. The human brain can easily interpret and organize evenly-numbered values, so by arranging your set using odd-numbered quantities, you provide subconscious tension and intrigue.
To avoid cluttering your scene, focus on the number three with this technique. Create group shots with three related products in the frame, or add a couple of non-distracting props to an individual item.
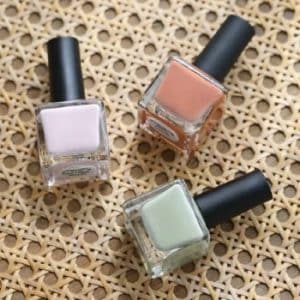
Sources: Urban Outfitters (left), Amazon (right)
In photography, using negative space means leaving most or part of the frame unoccupied. It adds a great deal of visual weight to the subject—drawing attention to it—while adding an artistic element to the photo. It also creates a usable space to edit in a logo or text.
Position your product on the right side of the frame when using negative space in your composition—it’s where the human eye naturally gravitates when first evaluating an image.

This product photo places the watch in the lower right corner with a simple reflection beneath it, leaving ample negative space in the majority of the frame. (Source: Photodoto)
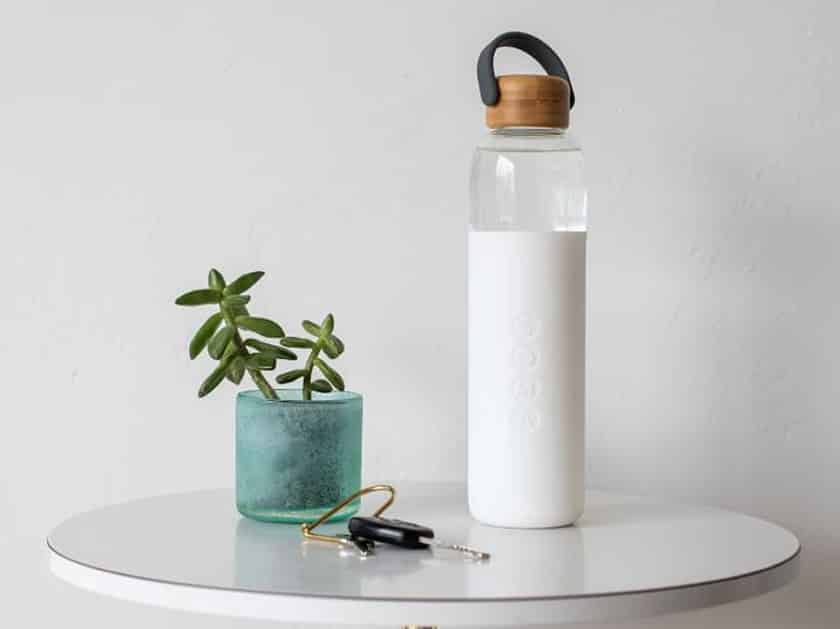
When selecting and arranging your props, try doing so in a way that connects them to your subject through diagonal lines. This guides the eye around the composition pleasantly, allowing the audience to absorb the image while ultimately drawing focus to the product.
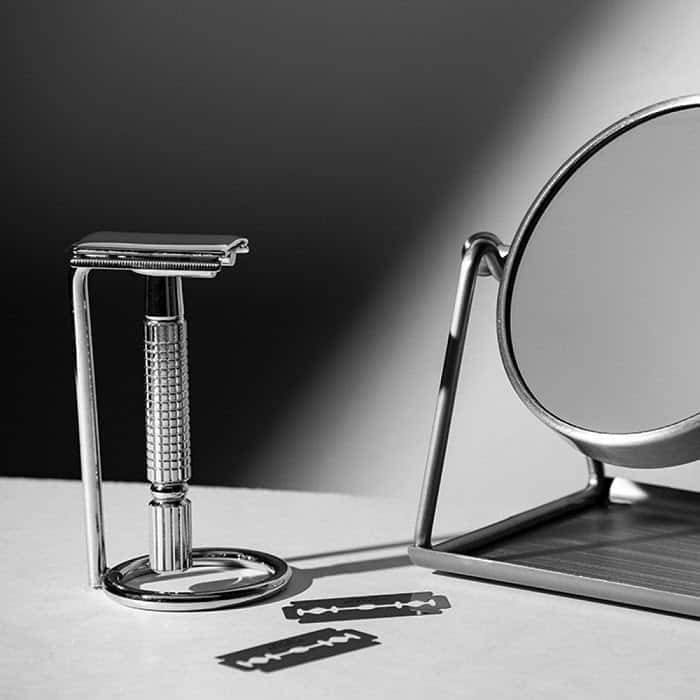
Diagonal lines created by the mirror’s metal stand and the razorblades direct the viewer’s eye to the product. (Source: Chad Verzosa for Expert Photography)
Colors can make a strong impact on your customers and suggest emotional attributes of your product. “Color psychology” is the commonly used name for this phenomenon, and its causes can be traced back to survival instincts and cultural conditioning.
Try incorporating backgrounds and props that present colors associated with traits of your brand. Additionally, consider how the product is meant to make the user feel, and match that sentiment with a color to use in your composition.
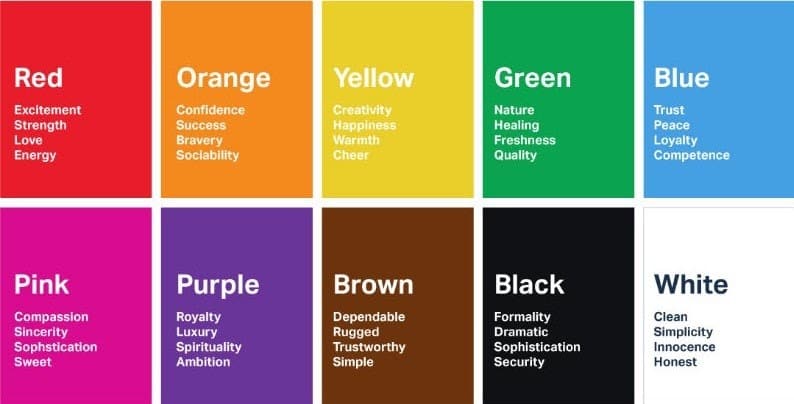
This chart lists common associations viewers consciously or subconsciously make with various colors. (Source: London Image Institute)
Don’t sacrifice quantity for quality, but be sure to take plenty of photos. Professional photographers often shoot a great excess of pictures in a single session with the intention of picking the top 10%–20% for actual use.
Along withrobust product descriptionsand asolid ecommerce platform, good product photos can transform your online store byengaging customers, creating conversions, and boosting site visibility.
Your product pictures can also contribute to online and offline marketing by promoting your brand on social media, online advertisements, catalogs, brochures, billboards and more. Keep this in mind to get the right shots for your intended channels.
Once you’re satisfied with your photoshoot, you can tweak your images in the editing phase—which we’ll cover next.
Step 6: Edit Your Photos
Most phones and computers have rudimentary editing capabilities to adjust and save your pictures, but better photo editing programs and apps offer more options. Plus, they allow you to optimize your files to load quickly, look better on browsers, and increase page visibility.
As an alternative, you canoutsourcethis task to freelancers on Fiverr for as little as $5 per image. These experts have not only skilled experience but access to high-tech (and expensive) software.
If you’d prefer to do it yourself, here are some top-ratedfree photo editing programs and appsto try:
These software choices allow you to improve lighting, balance colors, replace backgrounds, remove supports and mannequins, correct distortion, and edit shadows—all of which come in very handy for making product photos look attractive and professional. Check out your program’s user guide for detailed instructions on making the edits you need.
There are plenty of free photo-editing apps and programs available, but there’s a reason the pros use paid software. Editing suites (like the ubiquitous Photoshop) are considered to be worth the money due to their massive feature sets, versatile compatibility, and extreme user-friendliness.
Here are the three photo editors widely regarded as the best around:
- Adobe Lightroom– $9.99/month after free trial
- Adobe Photoshop– $20.99/month after free trial
- Skylum Luminar– Starts at $39/year
In addition to editing, you’ll need to use your software to reformat and optimize your image files, which we’ll go over in the next step.
Step 7: Optimize Your Files
Now that you’ve taken your product shots and polished them into gallery-worthy images, there’s one last consideration to take before uploading them to your store.
Your photo files need to be optimized for a few purposes—namely platform compatibility, load time, and search engine visibility.
Image size and resolution,file size,file type, andfile nameare the main factors to assess during this step. Here’s what you need to know:
TheSquare Photo Studio Appmakes optimizing simple with easy-to-follow prompts. When your photos are complete, you can sync them to your Square catalog or upload them directly to your online store.
Do’s & Don’ts of Product Photography
Ina poll by Etsy, they found that a staggering 90% of their customers ranked quality of product photos as the most important factor in their decision to make a purchase. It goes without saying that pictures of your items are vital toyour online store.
Here are some final tips for taking product photos at home:
Expanding Your Product Content With Video & User Photos
High-quality product photos are a must-have for any listing, but there’s only so much information your pictures can provide.
Product videos and user photos—or user-generated content (UGC) more generally—can give shoppers a dynamic, active understanding of the item and your brand as a whole, which can increase conversion rates and boost buyer confidence.
Did you know?
In a 2020 survey from Wyzowl, when asked how they would most like to learn about a product or service,69% of customers said theyprefer to watch a short video.
下面是如何分成这些强大的形式of product media:
Product videos bring online customers as close to the in-store experience as possible, and they can be made easily from your at-home studio.
An effective product video doesn’t have to be a high-budget production worthy of airing as a Super Bowl commercial. Your audience will appreciate and respond to any attractive media that gives them a more in-depth look at the product they’re considering.
Check out this compelling example from Target’s online store:

This professional product video is a compilation of simple clips that effectively demonstrate how the product is used, how it looks, and how it makes the user feel. (Source:Target)
Your home studio setup paired with a high-quality camera or smartphone is capable of creating great videos to add to your listings. Here are some pointers to get started:
Check for Platform Requirements
Including product videos on your online store is usually as simple as uploading them to the listing’s media field onyour ecommerce platform. Before investing time in shooting a product video, check with your store’s host for compatibility of a few key details:
- Media Type(make sure your listing can feature videos in general!)
- Length
- File Size
- Resolution
- File Type
These requirements can be met by making adjustments and conversions on your video editing software, which we’ll cover later on.
Understand Your Limitations
Advanced productions with hired talent, scripted dialogue, and complex sets simply aren’t the best choice for a DIY venture. Many store owners and marketers choose to outsource high-level videos like these to a local production company, which is a great option if you’ve got the budget for it.
Creating product videos on your own in a basic home studio can be perfectly successful—but it’s important to temper your expectations. When taking the plunge into video territory, aim for a rudimentary production that showcases your product without too much added flare.
Usable audio can be tough to capture, and requires specialized equipment (your camera’s built-in mic won’t cut it here, unfortunately). Plus, processing and equalizing the track you record is a whole other matter that requires time and dedicated software.
If you’re shooting videos to supplement a gallery of product photos on your ecommerce store, it’s wise for beginners to skip the audio altogether.
Know the Type of Product Video You’re Making
Start by planning your video and understanding its goals. Identify the features of your product that the customer would benefit from seeing, and determine how to concisely highlight them. Here are the main types of product videos commonly used:
- Demo:These videos show the item’s features and benefits by demonstrating it in action. A demo video can also consist of a simple view of the product from multiple angles and distances, which is a good idea if the merchandise doesn’t have an active function to illustrate.
- Explainer:This type of video provides a more explanatory look at how to use, set up, or install a product. It’s helpful for shedding light on goods that require a process and highlighting ease of use.
- Story:A story video provides context for the item’s features and benefits by displaying them in the user’s life or work. Similar to a lifestyle shot in product photography, it invites the audience to connect with the product by envisioning it in their own world.
- Advertisement:Although any type of product video can be used to advertise, this refers to a commercial-esque video that speaks more to the brand and emotional attributes of the product than its features. Ads are often geared toward convincing the viewer to become interested rather than providing them with clarity and understanding.
Edit Your Video
Once your product video is shot, simple editing software can help you turn it into a shining representation of your product and brand. Here are the top choices for video editing programs:
Lightworks
- Free
- For Windows, Mac, and Linux
- See theuser guide and tutorials
This program is famous for its approachability (thanks to its large collection of in-depth tutorials) and intuitive interface. Its free features include everything you’ll need to produce clean, attractive videos that sell your product, but a paid “pro” version is available to those who want to take their videos further.
VideoPad
- Free
- For Windows and Mac
- See theuser guide and tutorials
VideoPad is another great entry point to product video editing, complete with customizable transitions to weave product clips together nicely and exportable presets to optimize files.
UGC is any form of media—such as video, photos, reviews, or social media posts—created by users or customers of a brand.
According to a recent Stackla survey,90% of consumers say authenticity is importantto their buying decisions, and they are2.4x more likely to consider UGC authenticas compared to brand-created content.
That means incorporating UGC in your online store is a huge way to build trust with your customer base.
Photographic UGC is most common in the form of Instagram posts. Though it can’t replace a gallery of informative product photos, your customer’s content can have its place on your website, as well.
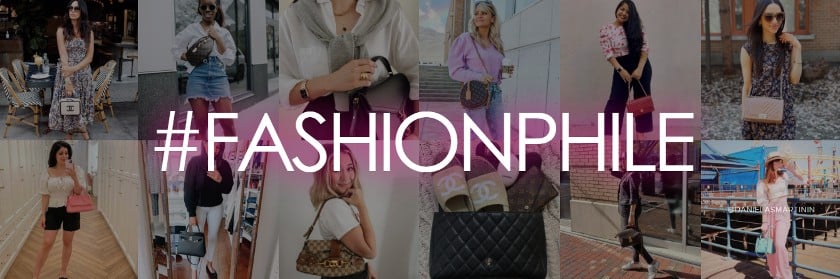
This fashion resale website features a banner of credited UGC on its homepage.
(Source: Fashionphile)
To source your own UGC, start by creating a branded hashtag and promoting it. When your users start posting pictures to weigh in on their experience with your brand, it’s only a matter of asking their permission to use their media before you’ve got high-quality content that boasts true authenticity. Butthe creator’s permission is legally required to use their content, so don’t skip this step!
The retail pet store Pet Smart is a big proponent of UGC. It promotes and monitors a whole host of hashtags on Instagram, following a standard procedure in the comments to legally secure permission to use their fans’ photos.

A common procedure brands will follow to obtain permission to use UGC is a “reply with yes” comment on the poster’s photo. (Source: Social Media Examiner)
It’s been shown that an average of65% of people willgrant permission to use their Instagram photosfor commercial purposes within 24 hours—so don’t be afraid to reach out! Often the creators appreciate the exposure your usage will provide them, so UGC in ecommerce benefits both parties—just remember toalwayscredit the creator.
Bottom Line
很难夸大high-qual的重要性ity product photos. As the quickest way to gather information, pictures are what viewers naturally gravitate toward, and they make the strongest impact of any asset on a webpage.
Thankfully, excellent product photography is attainable on any budget and can be done from the comfort of your own home, backyard, or balcony. With minimal equipment and space, you can take excellent photos that engage customers, make sales, and increase your listing’s traffic.