Top 16 QuickBooks Online Tips (Including Keyboard Shortcuts)
Tim is a Certified QuickBooks Time (formerly TSheets) Pro, QuickBooks ProAdvisor, and CPA with 25 years of experience. He brings his expertise to Fit Small Business’saccountingcontent.
Danielle is a writer for the Finance division of Fit Small Business. She has owned a bookkeeping and payroll service that specializes in small business, for over twenty years.
This article is part of a larger series onAccounting Software.
We prepared some of the best QuickBooks Online tips and tricks that can save you time by reducing repetitive tasks and minimizing scrolling for the data you need. Discover how to work more effectively by using keyboard shortcuts, automating some of your work, displaying data in different ways, and making your files more accessible. Most of these tips are explained in detail inour free QuickBooks Online tutorials.
1. Open Multiple Browser Windows
When using QuickBooks Online, opening multiple windows is a huge timesaver as it allows you to flip back and forth between screens. It’s also an easy way to make comparisons across multiple reports or QuickBooks features. For changes to appear, you may need to update the window by clicking Refresh on your browser.
You can open multiple browser windows within the same company file by duplicating the tab you’re working on (right-click your browser tab and selectDuplicate). If you’re using Internet Explorer, you can hitCtrl+Kto duplicate your tab.
Now that you have two tabs logged in to your account, you have the option of pulling one out of the window so that you can work on two different screens side-by-side.
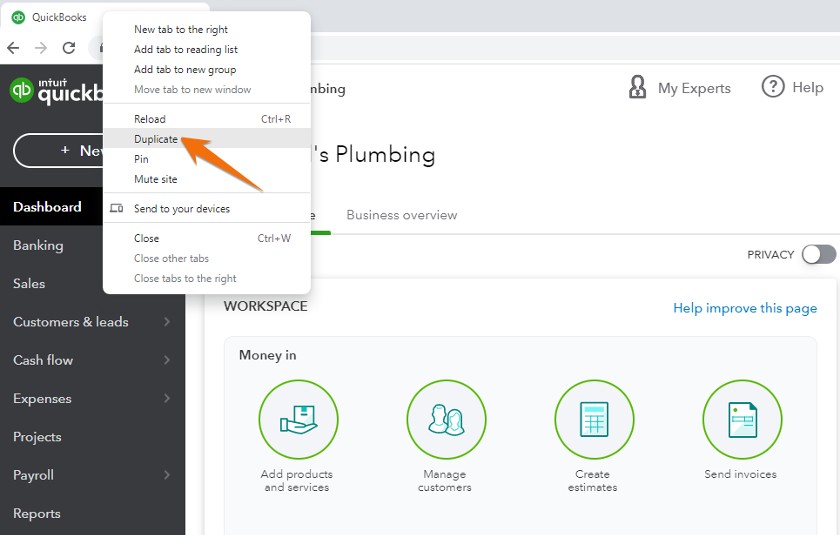
Opening multiple browser windows in QuickBooks Online
You can only use this simple method of opening multiple tabs if each tab is viewing the same company. For viewing different companies simultaneously, you have two options: incognito mode (or private browsing) or multiple browsers.
You can execute this and all the other tips discussed on any QuickBooks Online plan. However, to get the best value for your small business, read ourcomparison of QuickBooks Online plansso that you can pick the best one for you.
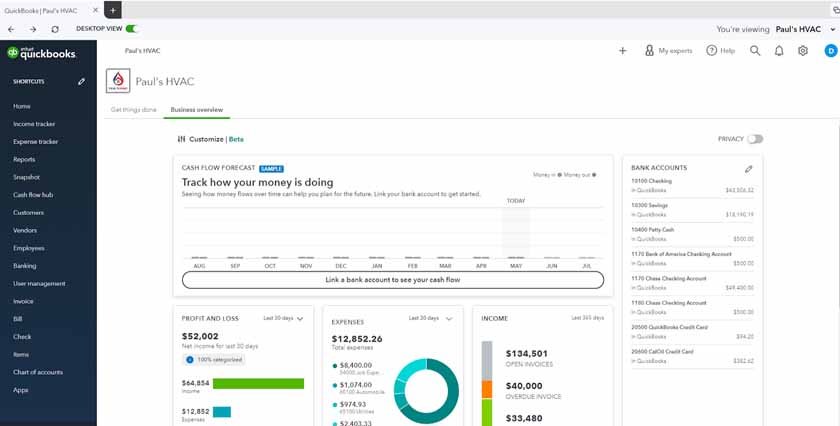
2. Connect Your Bank & Credit Card Accounts
Online banking, also known as bank feeds, is one of QuickBooks Online’s most helpful and time-saving features. When you connect an account, QuickBooks downloads and categorizes bank and credit card transactions for you automatically―you only need to approve the work. You can connect as many accounts as necessary.
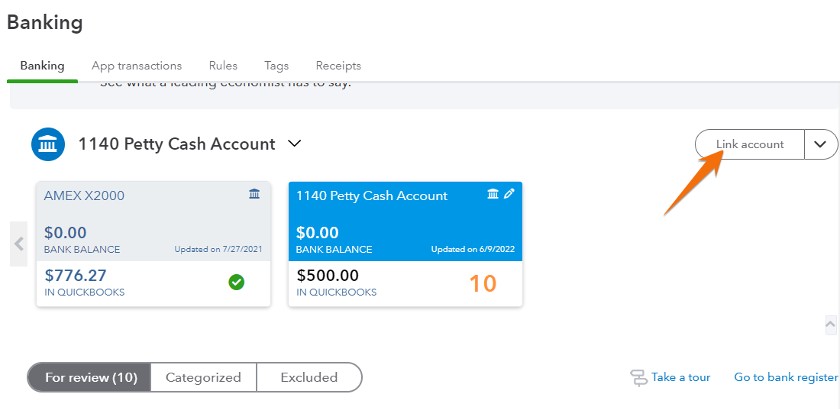
Linking an account in QuickBooks Online
To connect bank transactions and credit card accounts in QuickBooks Online, selectLink Accounton theBanking选项卡中,添加你的帐号,然后遵循onscreen steps to link your account information.
You may see our guides onhow to import bank transactions into QuickBooks Onlineandhow to connect your credit card to QuickBooks Onlinefor step-by-step guidance.
3. Memorize These Handy Keyboard Shortcuts
Another one of our QuickBooks Online tips and tricks is that keyboard shortcuts help save you time and allow you to keep your hands on the keyboard as you enter information. Use the keyboard shortcuts summarized in the table below when working in a transaction window.
|
Function |
Windows PC |
Mac |
|---|---|---|
|
Open the Expense Window |
Ctrl+Alt+X |
Ctrl+Option+X |
|
Open the Estimate Window |
Ctrl+Alt+E |
Ctrl+Option+E |
|
Open the Invoice Transaction window |
Ctrl+Alt+I |
Ctrl+Option+I |
|
Open the Receive Payment Window |
Ctrl+Alt+R |
Ctrl+Option+R |
|
Display the Lists Page |
Ctrl+Alt+L |
Ctrl+Option+L |
|
Display the Customers Page |
Ctrl+Alt+C |
Ctrl+Option+C |
|
Display the Vendors Page |
Ctrl+Alt+V |
Ctrl+Option+V |
|
Display the Chart of Accounts page |
Ctrl+Alt+A |
Ctrl+Option+A |
|
Display the Search Transactions Page |
Ctrl+Alt+F |
Ctrl+Option+F |
|
Display Keyboard Shortcuts |
Ctrl+Alt+/ |
Ctrl+Option+/ |
|
Print the Transaction |
Ctrl+Alt+P |
Ctrl+Option+P |
There’s also an easy way to access these common commands with a shortcut:
- Ctrl+Alt+?for Windows PC
- Ctrl+Option+COMMANDfor Mac
4. Set Up Items for Every Product or Service You Provide
QuickBooks Online has two basic sales items: products and services. We recommend creating items for every product or service you provide so that issuing invoices and entering purchases will be much quicker. This will also give you more detail with reports, allowing you to track financial info by product or service.
Our guide onhow to set up your products and services list in QuickBooks Onlinewill walk you through the process.
When creating an item, you’ll have four types to choose from Noninventory, Service, Bundle, and Inventory. Bundles and Inventory tracking are only available with QuickBooks Online Plus and Advanced. Bundle allows you to package and sell multiple items as a single product or service while Inventory allows you to track exact quantities and costs of products on hand.
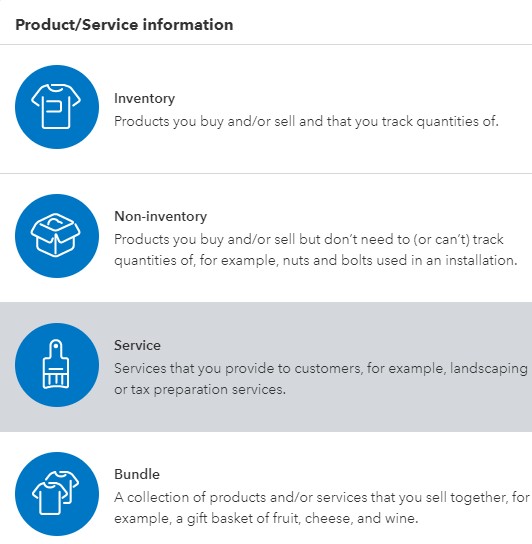
Adding a product or service in QuickBooks Online
5. Use the Undeposited Funds Account When Making a Deposit
Undeposited基金账户让pa的记录yments in QuickBooks until you deposit the same payments at your bank. You can think of the account as a virtual “lockbox” that you store your payments in until you’re ready to take them to the bank.
Banks often combine all the cash and checks you deposit into a single transaction. Once you have your deposit slip and know which payments your bank combined, you can do the same in QuickBooks. This makes tracing the deposits in your account register in QuickBooks to your bank statements much easier.
For more handy QuickBooks tips and tricks on the Undeposited Funds account, check out our tutorial onhow to record bank deposits in QuickBooks Online.
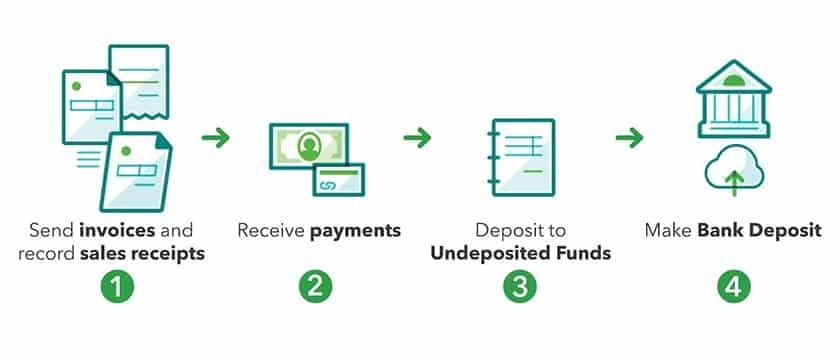
Steps for Using the Undeposited Funds account (Source: QuickBooks Online)
6. Reconcile Your Bank Account at Least Monthly
为了确保准确的财务数据,您必须reconcile your bank accounts monthly, ideally when you receive the alert that your bank statement is available. The process can be done quickly if you connect your online bank accounts to QuickBooks Online and perform regular upkeep throughout the month.
By reconciling, errors like duplicate entries and incorrect amounts can be identified because you’re matching transactions entered in QuickBooks Online against transactions shown on the bank statements. To reconcile your bank account:
- Step 1:Click onAccountingfrom the left menu bar and selectReconcile.
- Step 2:Choose the account you wish to reconcile.
- Step 3:Enter the ending account balance and date from your bank statement. You may also enter the service charge or interest earned if needed.
- Step 4:Match your transactions until the bank reconciliation has a difference of zero.
- Step 5:ClickFinish nowto save your changes.
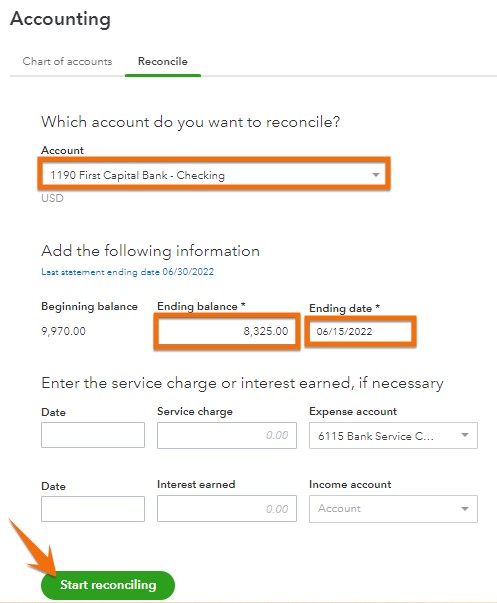
Preparing to reconcile a bank account in QuickBooks Online
For a detailed explanation of the process, see our tutorial onhow to process bank reconciliations in QuickBooks Online.
7. Use Class & Location Tracking
Classes represent different aspects of your business like departments or product lines. You can use classes to obtain deeper insights into the sales, expenses, and profitability of each part of your business. Once you turn on the feature, you can assign classes to transactions.
Here’s how to enable class and location tracking:
- Step 1:From your dashboard, click on the gear icon and selectAccount and Settings.
- Step 2:SelectAdvanced, then choose theCategoriessection to edit.
- Step 3. Toggle theTrack classesandTrack locationbuttons to on.
- Step 4:UnderAssign classes, selectOne to entire transactionorOne to each rowin transaction, whichever you prefer. CheckWarn me(not shown) when a transaction isn’t assigned a class. This is optional, but it’s good to turn it on so that when you look at reports, you know that everything has been classified.
- Step 5: SelectSaveand thenDone.
Turning location and class tracking on in QuickBooks Online
After completing the steps above, class and location fields or columns are added to your forms, so you can assign each transaction a class and location. After assigning transactions, you can print many reports separately for each class or location.
You may also want to see our guide onhow to set up advanced settings in QuickBooks Online—class and location tracking setup can be found in Step 4.
8. Attachment Source Documents
QuickBooks Online lets you upload and save attachments to any transaction. This makes referencing source documents easier and more efficient.
To add an attachment, follow these steps:
- Step 1:Open an invoice or other transaction.
- Step 2:Click theAttachmentsicon in the bottom left corner.
- Step 3:Browse for the files you want to attach.
- Step 4:ClickSave.
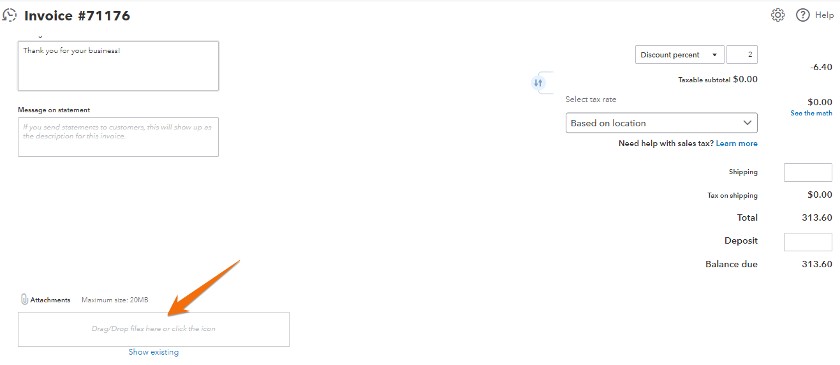
Adding attachments to an invoice
QuickBooks Online lets you view the source document when viewing the transaction. This is helpful for receipts, bank statements, copies of transactions, and so on.
9. Set Up Recurring Transactions
Rather than entering individual transactions manually that occur repeatedly, you can automate the process by setting up recurring transactions. These include bills, rent payments, income, and purchase orders from suppliers. This is one of our QuickBooks Online tips that helps save you time and also serves as a reminder for upcoming transactions.
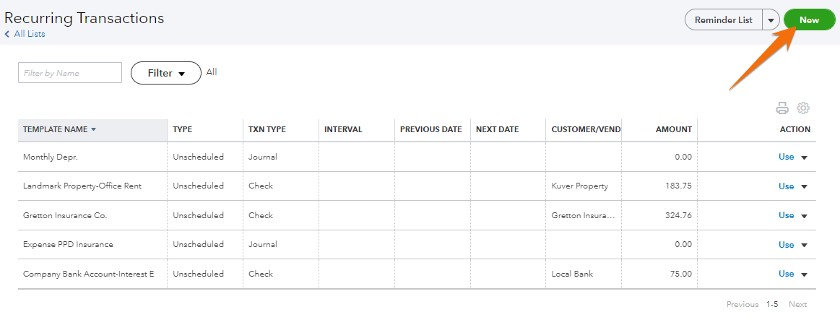
Setting up a recurring transaction in QuickBooks Online
Recurring transactions are available with QuickBooks Online Essentials and Plus, and you can create them by following this process:
- Step 1:Select the Gear icon at the top right of the screen.
- Step 2:Under Lists, selectRecurring Transactions.
- Step 3:ClickNew.
- Step 4:Select the type of transaction to create and selectOK.
- Step 5:Enter a template name.
- Step 6:Choose a type, such asscheduled,unscheduled, orreminder.
- Step 7:Enter the necessary information.
- Step 8:Save the template.
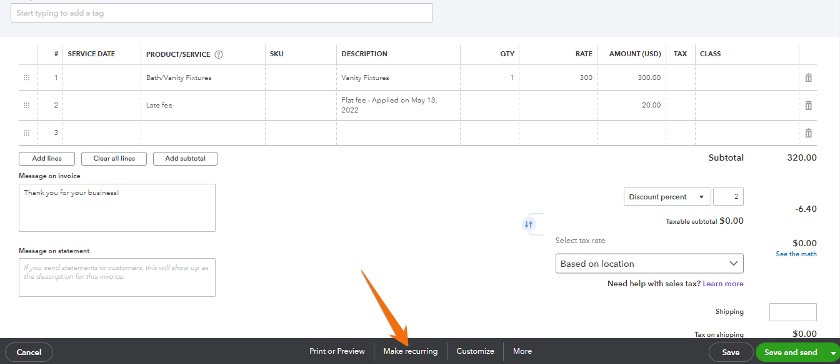
You can also set up recurring invoices by clicking Make Recurring at the bottom of the invoice window.
Adding a recurring invoice in QuickBooks Online
10. Pay Bills Online Directly From QuickBooks
而不是使用单独的软件来支付你的比尔ls online, you can pay directly without having to leave QuickBooks. Using Online Bill Pay, you can pay bills and send checks easily without asking your vendors to set up anything on their end. It lets you use a credit card to pay a bill, and then QuickBooks Online will send a check to your vendor. You can also pay 1099 contractors with paper checks and bank transfers, pay invoices, and schedule bill payments in real time.
You need to activate Online Bill Pay from your QuickBooks Online account before you can use it. To do this:
- Step 1:Click on +New.
- Step 2:SelectPay bills online.
- Step 3:Set up your bank account information.
- Step 4:Follow the prompts to connect your bank account then save your changes.
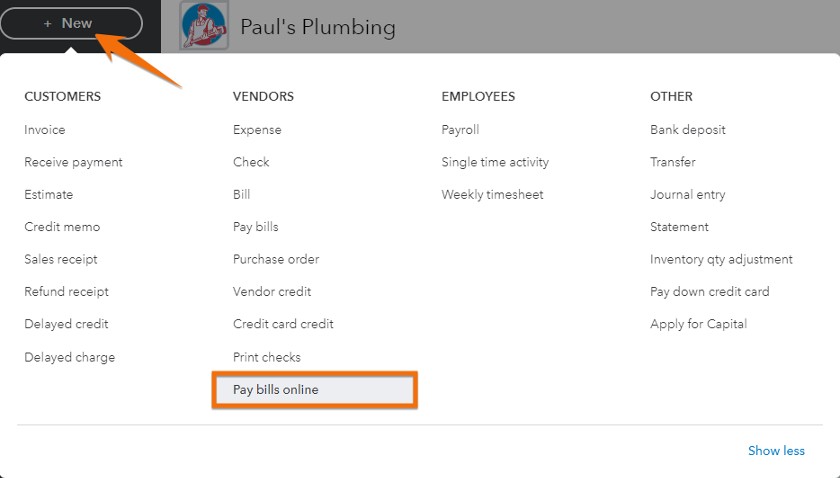
Access Pay Bills Online in QuickBooks Online
Note that QuickBooks Online Bill Pay is available in all versions of QuickBooks Online, except Accountant.
11. Save Your Favorite Reports
To view available reports, click on theReportsmenu item on the left navigation bar. On the Reports page, you’ll see that it’s divided into three tabs: Standard, Custom, and Management Reports. At the top of the Standard page is theFavoritespage. You can add any report to this list by clicking the star button next to it. This is one of our QuickBooks Online shortcuts that can help save you time if you frequently need access to the same report.
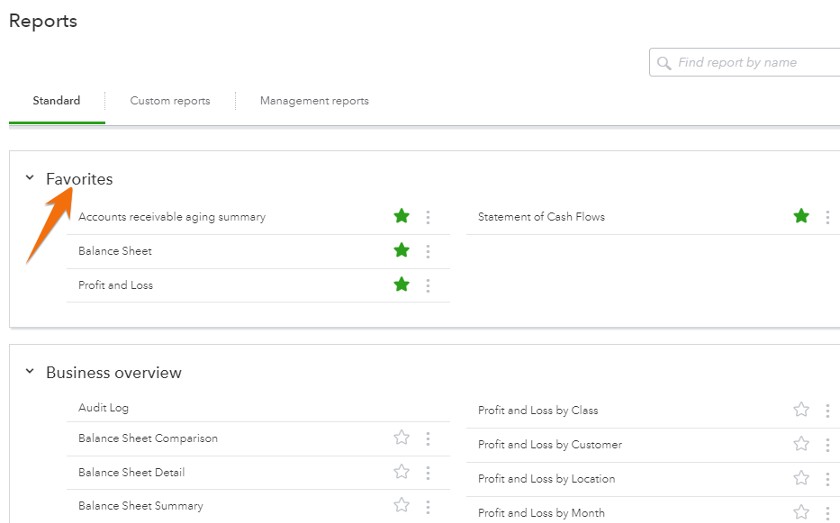
Favorite reports in QuickBooks Online
12. Find a QuickBooks ProAdvisor
If you’re new to QuickBooks Online, you can benefit from the QuickBooks Online ProAdvisor program. One of the reasons QuickBooks Online is so popular is that it sets you up with Intuit-certified local bookkeepers and accountants—experts who have demonstrated their proficiency with QuickBooks products by passing a series of exams.
With the program, a local certified public accountant (CPA) or bookkeeping expert will help you accomplish various tasks in QuickBooks, such as setting up your QuickBooks company, reconciling bank and credit card transactions, and generating the reports you need to file tax returns. If needed, they can also teach you some useful QuickBooks Online shortcuts that are specific to your industry.
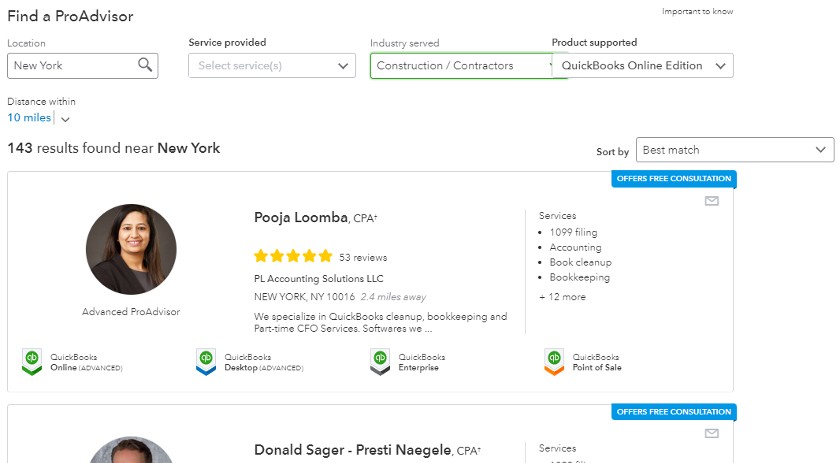
Finding a ProAdvisor on the QuickBooks website
找到一个QuickBooks ProAdvisor,你可以浏览through Intuit’s directory to find an accountant near you, depending on your city, state, and ZIP code. You can narrow your preferences down by specifying the type of services you need and the industry you’re in, such as manufacturing, construction, property management, and nonprofit.
Alternatively, you can sign up for QuickBooks Live. Doing so connects you to a QuickBooks ProAdvisor, but you’ll have to work with them directly within the QuickBooks platform.
For step-by-step guidance, read our guide onhow to find a QuickBooks ProAdvisor. It includes other platforms you can find a ProAdvisor on.
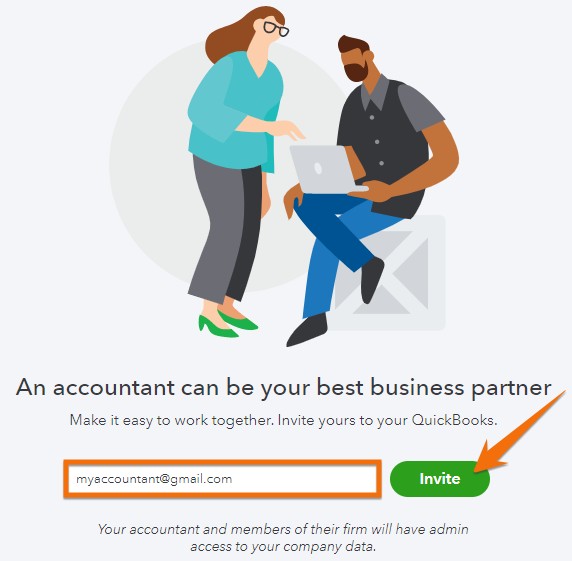
13. Add an Accountant User
Setting up your accountant as a user in your QuickBooks Online account is a good idea because it gives them access to your company. They can review your books, make corrections if needed, and collaborate on any issues.
Accountant users have additional privileges that allow them to undo entire reconciliations, write off invoices, and reclassify transactions. Accountant users also don’t count toward your usage limit—unless you make them your company’s primary admin.
To send an invitation to your accountant:
- Sign in to your QuickBooks Online as the primary admin.
- SelectSettings, thenManage users.
- Select theAccountantsorAccounting Firmstab.
- Enter your accountant’s email address, then selectInvite.
Your accountant will receive an email about the invitation and a link to access your QuickBooks Online company if they already have QuickBooks Online Accountant. If they don’t, they’ll need to sign up, which is free and gives them access to all of the features available in your version of QuickBooks Online at no additional cost to you.
Adding an accountant user in QuickBooks Online
14. Install the QuickBooks Online Mobile App
With mobile accounting becoming a norm among modern businesses, it’s crucial to have a mobile app that lets you access your favorite accounting features from your smartphone. The QuickBooks Online mobile app includes nearly all the features found in the desktop interface, with some added functions, like receipt capture and mileage tracking. Check outQuickBooks Online on Google PlayorQuickBooks Online on App Store.
|
QuickBooks Feature |
Accessible on the Mobile App |
|---|---|
|
Send Invoices |
✓ |
|
Record Customer Payments |
✓ |
|
Upload Receipts |
✓ |
|
Categorize Expenses From Bank Feeds |
✓ |
|
View Reports |
✓ |
|
Enter Unpaid Bills |
N/A |
|
Record Billable Time |
N/A |
15. Use the QuickBooks Online Desktop App
In addition to its cloud interface, QuickBooks Online offers a desktop app, which has several benefits including easy accessibility. The app allows you to access your QuickBooks data from anywhere, without having to open a web browser or log in to the website.
It also stores data locally, which means you can access your data even when you don’t have an internet connection. It is designed to work faster than the web version, with faster page loading times and quicker access to your data.
同时,它提供了一个更加友好的用户界面,with a streamlined dashboard and simplified navigation. You can choose a layout similar to QuickBooks Desktop Premier, and you can also collaborate with others in real time, making it easy for you to work with your team and your accountant. It has many time-saving features as well, such as the ability to import bank transactions, create recurring invoices, and set up automatic reminders.
QuickBooks Online Desktop Dashboard
16. Utilize Popular QuickBooks Online Integrations
One of the benefits of using QuickBooks Online is that you have access to hundreds of integrations. There are a few in particular that can be especially helpful to small business owners:
- Shopify:Especially useful for retail businesses, Shopify integrates with QuickBooks Online and allows users to sync their sales and transaction data with their accounting software. Check out ourShopify reviewto learn more about the solution’s features.
- Gusto:Gusto is a payroll and human resources (HR) software that integrates with QuickBooks Online to simplify payroll processing and tax filings. Read ourreview of Gustofor more information about the services it provides.
- HubSpot:HubSpot’s integration with QuickBooks Online helps businesses manage their customer relationships, marketing campaigns, and sales data in one place. If you’re especially interested in customer relationship management, read ourHubSpot CRM review.
- Expensify:Helping businesses manage employee expenses, Expensify integrates with QuickBooks Online to automate expense reporting and tracking, with features like individual tracking, expense policies, and approvals. Ourreview of Expensifyshares more details about the platform.
Frequently Asked Questions (FAQs)
The basic functions of QuickBooks Online are sending invoices to customers, tracking and paying bills, compiling revenue and expenses for financial statements, tracking employee time for billing and payroll, and making online payments to vendors.
Yes, there are many good resources available to learn QuickBooks Online, includingour free QuickBooks Online tutorials.
QuickBooks is available on two platforms, desktop and cloud-based. QuickBooks Desktop might become obsolete. However, it’s still a great program and a new 2023 version has been released. However, Intuit is pushing users toward its online program. In my opinion, QuickBooks Desktop will remain fully supported and available for the next few years, but it’ll probably be discontinued someday.
Yes, customer support is available for QuickBooks Online users, including phone and chat support, online resources, and a community forum.
The cost of QuickBooks Online depends on the plan chosen. The plans range from $30 to $200 per month, with the option of additional features for an extra cost.
Bottom Line
As ourbest small business accounting software, QuickBooks Online has a variety of tricks to make your experience more efficient. Some features, such as setting up recurring transactions, creating a product and services list, and automating transactions, save you time.
Using keyboard shortcuts allows you to keep your hands on the keyboard while you’re entering transactions. Also, connecting your bank and credit card accounts and using the Undeposited Funds feature assists you with reconciling your accounts. Information on how to perform many of these functions can be found withinour free QuickBooks Online tutorials.