How To Pay Bills in QuickBooks Online
Tim is a Certified QuickBooks Time (formerly TSheets) Pro, QuickBooks ProAdvisor, and CPA with 25 years of experience. He brings his expertise to Fit Small Business’saccountingcontent.
Mark has researched and reviewed accounting software at Fit Small Business since 2019 and has developed an extensive knowledge of accounting software features and how unique business needs determine the best accounting software.
This article is part of a larger series onAccounting Software.
In this tutorial, we’ll walk you through the process of how to pay bills in QuickBooks Online by printing checks. You’ll also learn how to submit electronic payments for free through the Online Bill Pay feature.
This guide is part of ourfree QuickBooks Online tutorials. You can follow along in your own QuickBooks account to get hands-on experience as we go along. If you don’t have QuickBooks, you can choose from a 30-day free trial or 50% off for three months.
Pay Bills by Check
Click the+ Newbutton at the top of the left menu bar and then selectPay Billsin the second column under Vendors, as shown below.

Navigate to QuickBooks Online bill payments
ThePay Billsscreen shows a list of all bills that are due and enables you to select the bills you want to pay. If you haven’t recorded bills in QuickBooks yet, you can check out our tutorial onhow to enter bills in QuickBooks Online.
To process bill payments, you have to complete several fields on thePay Billsscreen, such as:
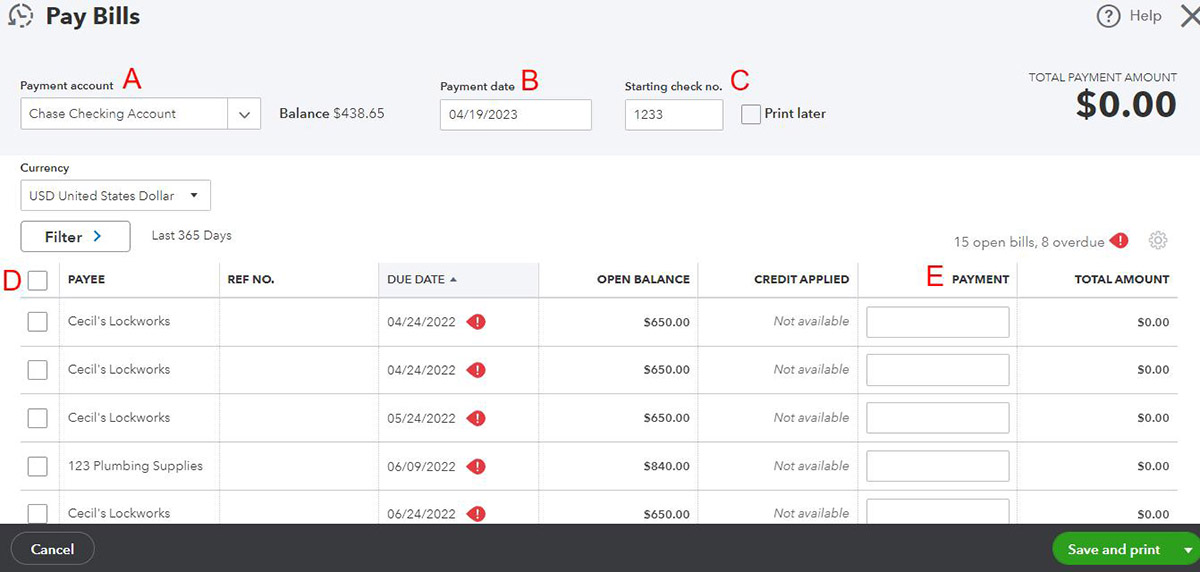
Select bills for payment in QuickBooks Online
- A. Payment account:Select the checking account that you wish to use to make the payments. If you haven’t set up a bank account, you’ll need to do so before you can pay bills in QuickBooks. Refer to our tutorial on如何导入银行交易吗QuickBooks Online, which also covers connecting bank and credit card accounts.
- B. Payment date:Enter the date to print on the checks. This is usually the current date.
- C. Starting check no.:Provide the starting check number. Alternatively, you can place a checkmark next toPrint laterto save the checks and print them at another time.
- D. Select bills:Select bills to pay by placing a checkmark in the box to the left of the bill.
- E. Payment:After you select a bill to pay, QuickBooks will default the payment amount to the entire open balance. However, you can change the payment to a lesser amount if you want to make a partial payment.
After completing all the required fields and selecting the bill/s to pay, click the greenSave and printbutton on the lower left corner of the screen (shown in the image in Step 2). The bills will be marked as paid, and QuickBooks will take you to thePrint Checksscreen.
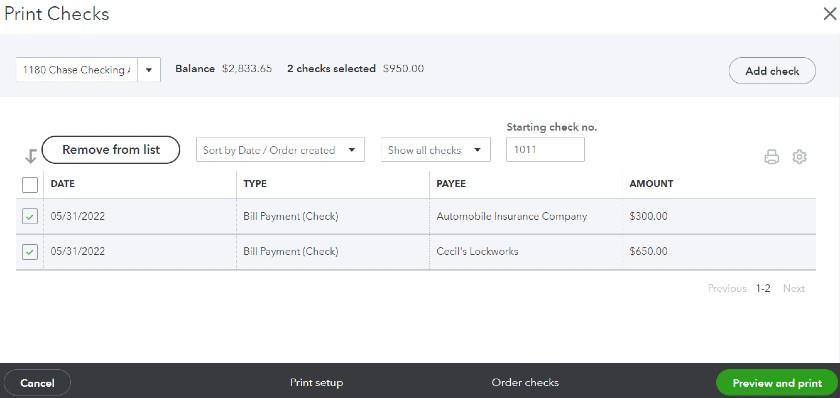
ThePrint Checksscreen displays a list of all the checks that have been written from the specified checking account. To print the check/s, place a checkmark next to the check/s you wish to print, provide a starting check number, and click the greenPreview and print button. Finally, follow the on-screen instructions to preview and print your checks.
Print checks in QuickBooks Online
Printing checks later:This Print Checks screen can be accessed anytime by clicking on +Newat the top of the left menu bar and then selectingPrint checksin the second column under Vendors.
Pay Bills Electronically
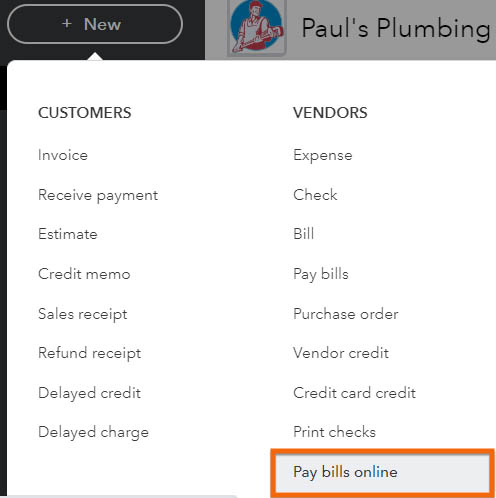
Click on the +Newbutton on top of your QuickBooks screen, and then selectPay bills online, as shown below.
Pay bills online in QuickBooks Online
Heads up:In the video, you’re instructed to click on the greenSchedule payments onlinebutton at the bottom of the Pay Bills screen. If you’re using the latest version of QuickBooks Online, then you should be using thePay bills onlineunder the +Newbutton to access QuickBooks Online Bill Pay.
Next, QuickBooks Online will display a list of your outstanding bills. Select the checkbox of the bills you wish to pay and then click on theNextbutton (not shown) on the Pay Bills window.
Click on the vendor name for each bill to open a screen to input the necessary information to make an online payment. Provide the necessary payment details, as indicated below.
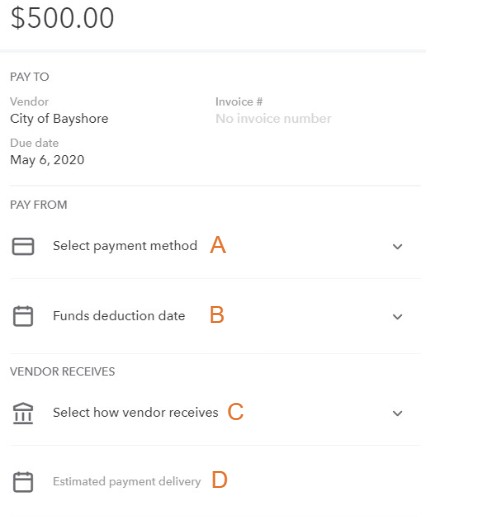
QuickBooks Online bill payment details
A. Select payment method:Choose the method you want to use to make the payment. After clicking in this section, you’ll have the following options:
- Bank account (free)
- Debit card (free)
- Credit card (2.9%)
The first time you use each of the payment options, you’ll need to provide the details for your payment account.
Pay any vendor with a credit card:QuickBooks Online Bill Pay provides a convenient way to pay any vendor with a credit card, even if the vendor doesn’t otherwise accept them.
B. Funds deduction date:Select the date you want the funds deducted from your account. Generally, transfers aren’t instantaneous, so you might need to choose a deduction date a few days before the due date.
C. Select how vendor receives:Specify how you would like the vendor to receive your payment. Both options are free:
- Bank transfer, or automated clearing house (ACH) in one to four business days
- Paper check in five to seven business days
D. Estimated payment delivery:QuickBooks will provide an estimated date that the vendor will receive your payment. If this is after the due date, you’ll need to specify an earlier deduction date or faster delivery method.
Once you have provided the details for each bill payment, click theSubmit paymentbutton to submit your scheduled payments.
Why You Should Use Online Bill Pay in QuickBooks
Online Bill Pay is one of QuickBooks’ standout features that makes it our overallbest small business accounting software. It is ideal for businesses wanting to pay their bills electronically through their QuickBooks account. It is a convenient and efficient way to manage bills and payments as it eliminates the need for manual checks and paper-based processes.
Frequently Asked Questions (FAQs)
Yes, QuickBooks Online allows you to track bill payments and view the payment history for each bill from theExpensestab.
Yes, you can set up recurring payments for bills that are due on a regular basis, such as rent or utilities. To do this, select the bill you want to pay and click theMake Recurringbutton. Then, choose the frequency, start date, and end date for the payments.
Wrap Up
你刚学会了如何在QuickBooks支付账单Online. You can now pay bills by either printing checks or using the free QuickBooks Online bill payments feature. The next tutorial in our QuickBooks Online Training Course ishow to enter bank transactions in QuickBooks Online manually.