How To Create and Send Invoices in QuickBooks Online
Tim is a Certified QuickBooks Time (formerly TSheets) Pro, QuickBooks ProAdvisor, and CPA with 25 years of experience. He brings his expertise to Fit Small Business’saccountingcontent.
Mark has researched and reviewed accounting software at Fit Small Business since 2019 and has developed an extensive knowledge of accounting software features and how unique business needs determine the best accounting software.
This article is part of a larger series onAccounting Software.
This lesson covers how to create an invoice in QuickBooks Online—either from scratch or an existing estimate. We’ll also show you how to send your invoice to your client and print it if needed.
Ourfree QuickBooks tutorials, including this one, are designed for you to follow along in your own QuickBooks account. To those who haven’t subscribed, you may sign up for a 30-day free trial or get a 50% off for three months.
How To Create an Invoice From Scratch in QuickBooks Online
Click+ Newat the top of the left menu bar of your QuickBooks Online dashboard and then selectInvoicein the first column underCustomers.
Click on + New and select Invoice
From the invoice screen, provide the necessary information to complete your invoice.

发票在QuickBooks在线创建表单
The exact fields that will appear depend on the settings you selected, as discussed in ourguide on how to customize invoices on QuickBooks Online. However, below are the most common fields you’ll have to complete:
- Customer:Select the customer and job, if applicable, that will receive the invoice. If this is a new customer, clickAdd newfrom the customer drop-down box and provide the necessary customer information, as explained in ourtutorial on how to set up customers in QuickBooks Online. Once a customer is selected, the fields for email, billing and shipping addresses, terms, and location should populate automatically.
- Invoice date:The invoice date should be the date you wish to send this invoice.
- Service date:Enter the date you provided the service or shipped the product.
- Product/Service:Select the product or service that you provided from your list of products and services. If this is a new product or service, chooseAdd newand provide all the necessary information, as illustrated in ourcourse on how to set up the products and services list in QuickBooks Online. Once a product or service has been selected, the fields for description, rate, tax, and class should populate automatically.
- 条款:Indicate when you want to be paid. For example, select Net30 if you want your customer to pay your invoice within 30 days after the invoice date.
- Due:This field is calculated automatically when converting from an estimate or can be input when creating an invoice. It shows the portion of the total amount that’s due currently for this product or service. This should be the full amount unless this is a partial invoice.
- Quantity:Enter the quantity of each product or service sold. Once the quantity is entered, the amount will be calculated automatically as quantity times rate.
Once you’re satisfied with your invoice and intend to send it at a later time, click on theSavebutton on the lower right side of the screen. If you wish to preview or print the invoice before saving or sending it, click thePrint or Previewbutton on the bottom menu bar of the invoice screen and then select thePrint or Previewdrop-down as shown below.

Print or preview an invoice in QuickBooks Online.
When you clickPrint or Preview, you should see what your invoice looks like. Below is a sample invoice we created for our fictitious company, Paul’s Plumbing.

Sample Invoice created in QuickBooks Online
If you wish to send your invoice right away, clickSave & Send. QuickBooks will create an email automatically based on the default settings you created in ourtutorial on how to set up messages in QuickBooks Online. You can customize the default email message for this invoice if you wish. Click the greenSend and closebutton when you’re ready to send the email. Then, you’ll receive a notification that the invoice was emailed to your customer successfully.
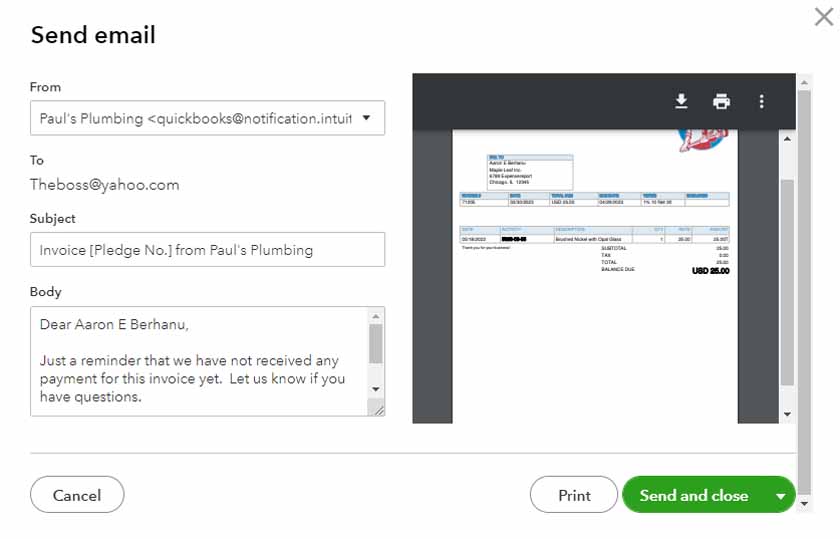
Email invoice template that you can customize before emailing your invoice
How To Convert an Estimate to an Invoice in QuickBooks Online
From the left menu bar, hover overSales, and then clickEstimates,如下所示。QuickBooks di的旧版本dn’t have theEstimatesdrop-down menu, so you would need to navigate toCustomersinstead.

Navigate to Customers in QuickBooks Online
From theEstimates选项卡上,你u’ll find a list of all your outstanding estimates.
Since Our Last Update:
QuickBooks Online now has a centralized Estimates tab, which instantly shows all your outstanding estimates and has more organized action buttons. For instance, in the older version, you could convert an estimate to an invoice even if it has a pending status. Now, you can only invoice for estimates that are marked approved.
If you wish to see the content of your estimate, click anywhere on the estimate entry line. A new pop-up window will appear, displaying essential information about your estimate, including the amount, transaction date, and estimate activities. If you wish to make changes, click on the greenEditbutton on the lower right side of the window. You may also perform additional actions, such as duplicating the estimate.
If you don’t have an existing estimate yet and wish to create one, you can head to ourtutorial on how to create quotes, bids, and estimates in QuickBooks Online.
New estimate management screen in QuickBooks
Click onCreate invoiceon the far right side of the estimate entry. In the screenshot below, we wish to convert Estimate 1065 into an invoice.
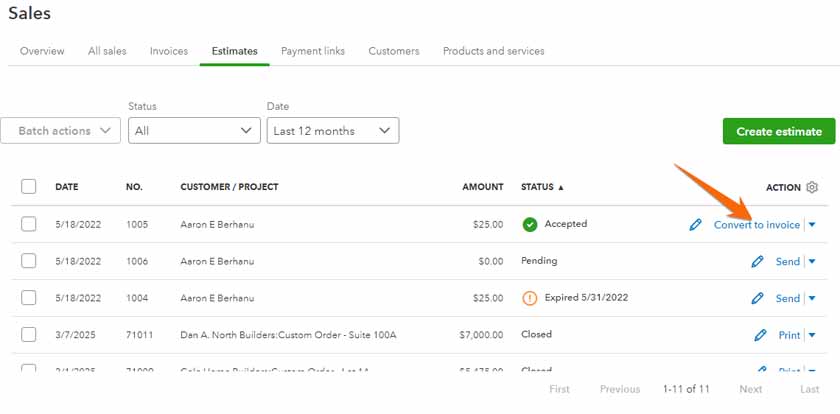
Convert an existing estimate into an invoice in QuickBooks Online
A popup window will then appear, asking what portion of the estimate you want to invoice. You can choose to convert the entire estimate or only a portion of the invoice. This is useful for progress billing in larger jobs. Then, click theCreate invoicebutton.
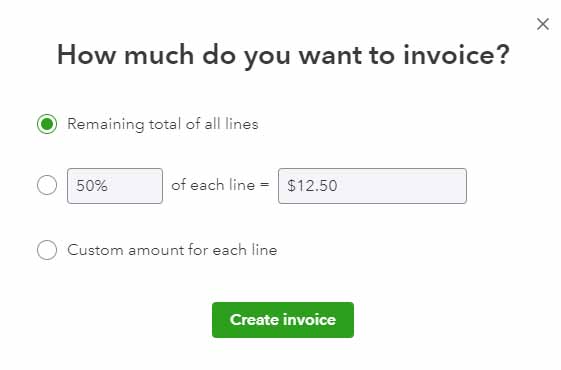
Select a portion of the estimate to convert to an invoice
After clicking theCreate invoicebutton, QuickBooks Online will open the create invoice screen with all the fields populated automatically from the estimate information. Then, you can review and make any changes that you wish.
Once you provide all the required information and are satisfied with the invoice, clickSaveorSave and Send. If you need to send the invoice immediately, selectSave and Sendand continue as you did in Step 3 of creating an invoice from scratch.
Benefits of QuickBooks Invoicing
- Create and send customized invoices easily:QuickBooks Online makes it easy to create and send invoices to your clients. The creation process is simple and straightforward, and you can customize your invoices to make them as professional-looking and unique as possible. You can choose to upload your logo, change font color and style, and add a personalized message.
- Track invoices and payments:QuickBooks lets you track all your invoices and payments made by your customers. When you create an invoice in QuickBooks, your financial statements reflect the income from the sale, as well as the receivable owed to you from the customer. QuickBooks Online will track your accounts receivable and provide tools to help collect payment from your customers, including built-in payment links and automatic reminder emails.
With these benefits of QuickBooks Online invoicing, we awarded QuickBooks our overallbest invoicing solutionand ourleading small business accounting software.
Frequently Asked Questions (FAQs)
You can create an invoice in QuickBooks in two ways: create one from scratch or from an existing estimate.
No, and you have to purchase a QuickBooks subscription. All QuickBooks Online plans, which run from $30 to $200 per month, allow you to create and send invoices. OurQuickBooks Online versions comparisoncan help you decide which fits your invoicing needs.
Wrap Up
Congratulations on learning how to create an invoice in QuickBooks Online. You can now create invoices from scratch or by converting accepted invoices. The next tutorial ishow to receive payments in QuickBooks Online.