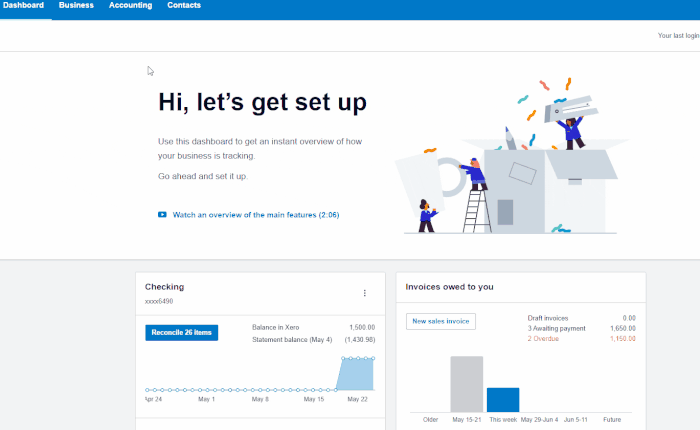
How To Track and Pay Bills in Xero
This article is part of a larger series onAccounting Software.
In this tutorial, the third of ourfree Xero courses, we’re going to cover how to add vendors to your account. We’ll also look at how to pay bills in Xero as well as how to view, record, and manage them.
We created our courses to help you understand how to use Xero better, one of ourtop-recommended small business accounting software. You’ll get the most out of this by following along in your own account. If you don’t already have one, you can sign up for a 30-day free trial with no credit card required.
Vendors, or suppliers as they are referred to in Xero, are added in much the same way as your customers. Both fall under the category of Contacts, and it’s only when they are associated with a transaction—in the case of Suppliers, a bill or purchase order—that they are classified as a Customer or Supplier. So, they must first be added as a contact.
To navigate to the Suppliers section, follow these steps:
- Step 1:In the top menu bar, selectContacts, thenSuppliers.
- Step 2:Click the greenNew Contactbutton in the upper right corner.
Navigating to Suppliers section in Xero
There are two sections that you’ll need to complete:Contact InformationandFinancial Details, which are discussed in more detail below.
When adding a contact, you’ll want to enter as much information as possible, including:
- Contact Name
- Account Number
- Primary Person
- Phone, Fax, Mobile, and Direct Dial
- Skype Name/Number
- Website
- Postal Address
- Street Address
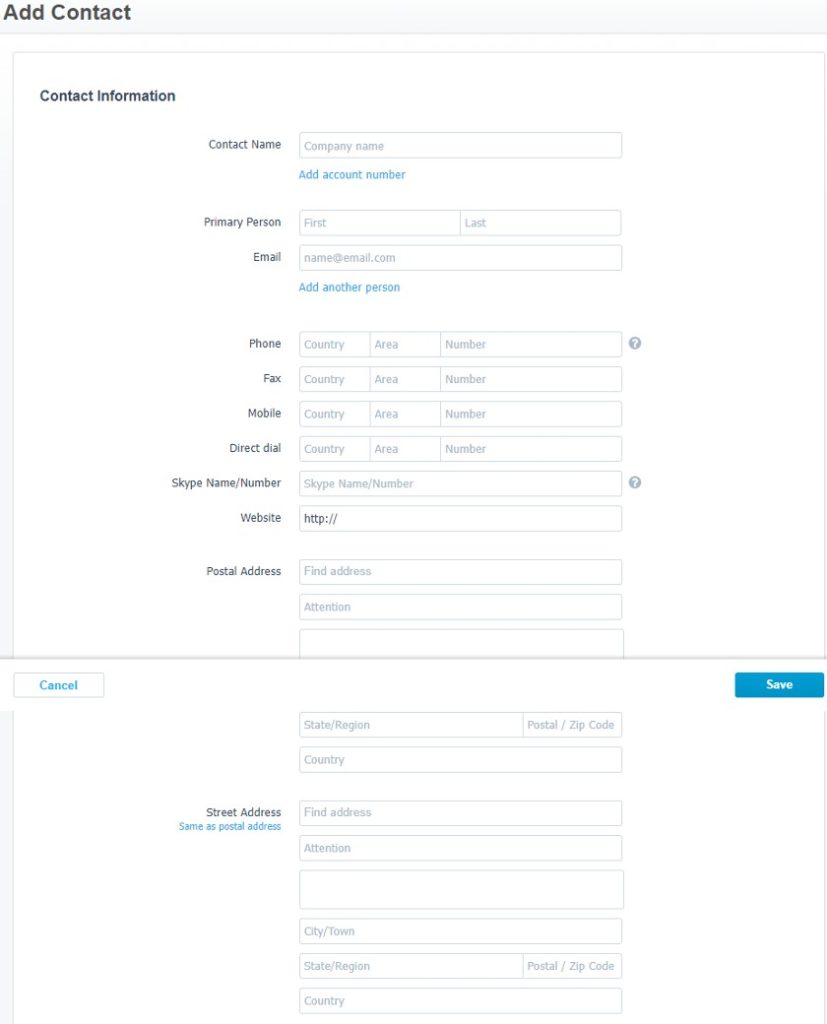
Adding a contact information for a Contact in Xero
You can also enter default settings that will help with invoicing. All defaults can be overridden in individual transactions. These financial details include:
- Purchase Settings:The choices for Purchase Settings are the same as Sales Settings. This is applicable for suppliers, not customers. You also have the option of selecting a default account.
- Tax:输入所有税务信息,其中包括different tax ID numbers, a default sales tax, and default purchases tax.
- W-9 Business Classification:Select the contact’s business structure here, such as S-Corporation or Sole Proprietorship. This information is available from the W-9 form required to be provided by service providers. If no W-9 is required, then leave this field blank.
- Add to 1099 Contact Group:Check this box if you’re required to send this supplier a 1099 form for taxes. For more information on who qualifies as a 1099 worker, see our1099 vs W-2 workersarticle.
- Batch Payments:Indicate the bank account information if you expect to send batch payments.
- Bills Due Date/Invoices Due Date:If you’d like to assign a regular due date for this supplier, you can indicate it here.
When you’re finished entering the Contact Information and Financial Details, be sure to click theSavebutton.
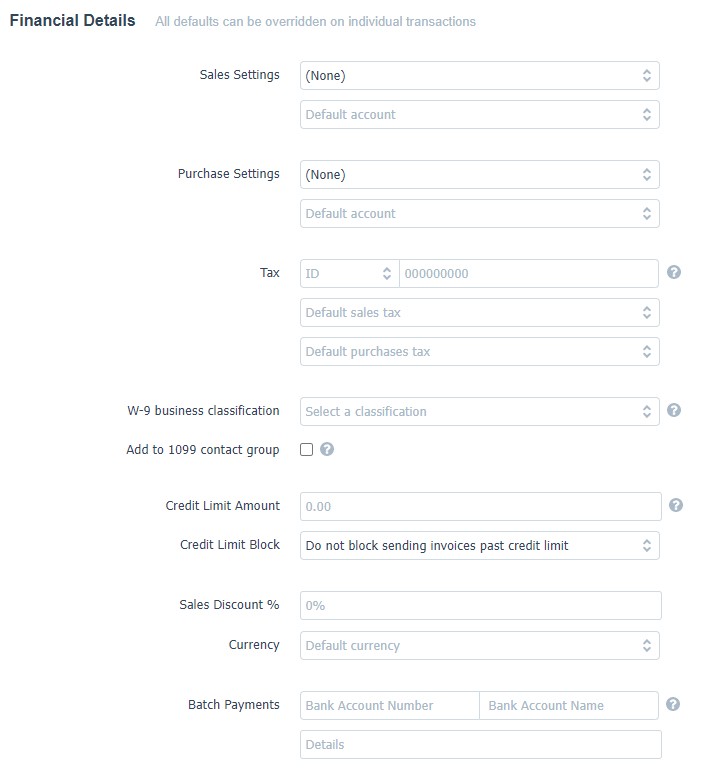
Adding financial details for a Contact in Xero
Entering bills in Xero is a two-step process because bills must first be approved before you can record a payment. This is useful for situations where a bookkeeper enters the bills and submits them to the business owner or manager to approve before payment can be issued. In this section, we’ll discuss the process of both entering and approving a bill in Xero.
To navigate to the bill payment section:
- Step 1:Click onBusinessin the top menu bar.
- Step 2:SelectBills to Pay.
- Step 3:Click onNew Bill.
Navigating to the bill payment section in Xero
To record a new bill, enter the following information as shown below:
- From:Enter the name of the supplier you received the bill from
- Date:Enter the date displayed on the bill you received
- Due date:The date the bill is due for payment, which is set by your supplier
- Reference:Enter the invoice number from the bill. This will allow you to find the invoice number easily if you need it for communicating with your vendor.
- File attachments:Click the file icon to attach any relevant files to your bill, such as an image of the bill itself
- Total:The overall amount that you owe. It includes all of the line items and tax depending on your selected setting
- Currency:If you have the Business Edition plan, which includes multicurrency, you can select a foreign currency that you have already added. If you haven’t yet added it, click Add Currency. You can edit the exchange rate if required.
- Amounts are:Select the tax setting to apply to the bill total. If the item has sales tax, select Tax Exclusive to add tax to the total, or Tax Inclusive if the item price always includes the sales tax.
- Item:Select an existing inventory item or add a new item. The account field should populate automatically based on the item you select.
- Description:Enter a description of the item you’ve purchased. This should autopopulate if you’ve selected an Item.
- Quantity:This is the quantity of the items you’ve purchased.
- Unit Price:The price of the item.
- Account:Xero populates the Account field based on how you have created bills in the past or the Item you selected, but you can edit this suggestion.
- Tax Rate:This is the tax on the transaction, which is required only if you have selected Amounts are Tax Exclusive or Tax Inclusive.
- Assign expenses to a customer or project:You can assign expenses to the customer to recover expenses from a job or to a project to record it as a project expense.
Once you have entered the above information, click the blueSavebutton.
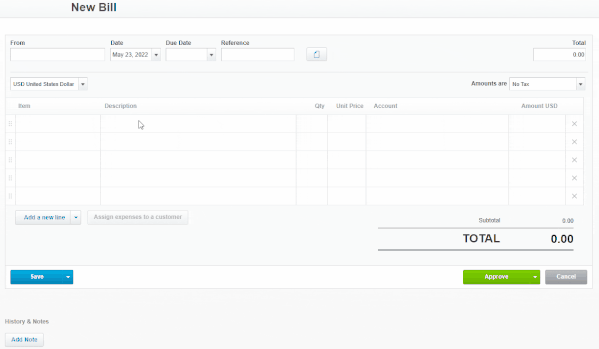
Entering a new bill in Xero
付款批准一项法案:
- Step 1:In the top menu bar, selectBusiness, thenPurchase overview.
- Step 2:UnderBills, click theDrafttile to view all draft bills.
- Step 3:Select the checkbox next to one or more bills, then clickApprove.
Approving bills in Xero
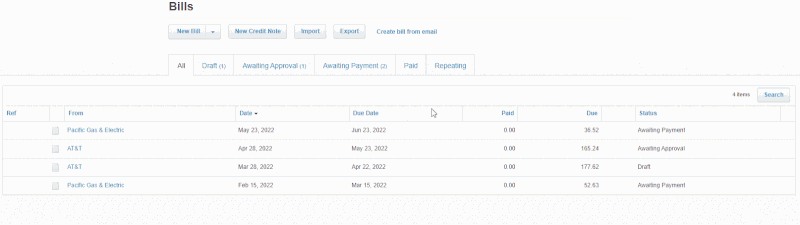
You can view a list of bills that are in draft, waiting to be approved, or are ready to be paid. This is useful in tracking unpaid bills in Xero. To view your unpaid bills:
- Step 1:In the top menu bar, clickBusiness.
- Step 2:SelectPurchase overview.
- Step 3:UnderBills, click the status panel of the bills you want to view.
- Step 4:Select a bill to view its details.
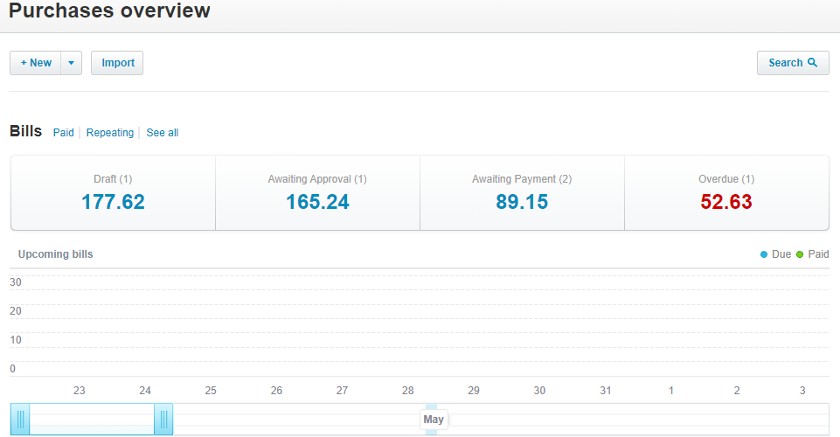
Purchases overview section in Xero
View an Aged Payables Summary Report
An Aged Payables Summary report displays the amounts you owe based on the age of the transactions. The total amount listed includes all outstanding bills, credit notes, expense claims, and overpayments. For the most accurate information, enter your purchase transactions and reconcile your bank accounts before running the report.
To run the report:
- Step 1:In the top menu bar, selectAccounting.
- Step 2:Click onAged Payables Summary.
Navigating to Aged Payables Summary report in Xero
Xero allows you to customize your reports by changing the following fields:
- Date:Select a date, or click the arrow next to the date and choose a set reporting period, such asEnd of last quarter
- Ageing By:View aged payables based on theirDue DateorInvoice Date
- Ageing Periods:Choose the number of periods to display, and the timeframe for each period. You can also choose to display the data byPeriod numberorDate range. After selecting your options, clickApply.
- Columns:Select the information that you want to appear on the report, such as Contact and Contact Account Number
- Grouping/Summarizing:Group or summarize the data byContact GrouporDocument Type
- Filter:Use the Filter button to filter data from certain columns, such as Contact Account Number. To use, clickFilterand select a column to filter by, then enter or select details. ClickApplywhen done. As you add more filters, the report displays results based on all of your filters combined.
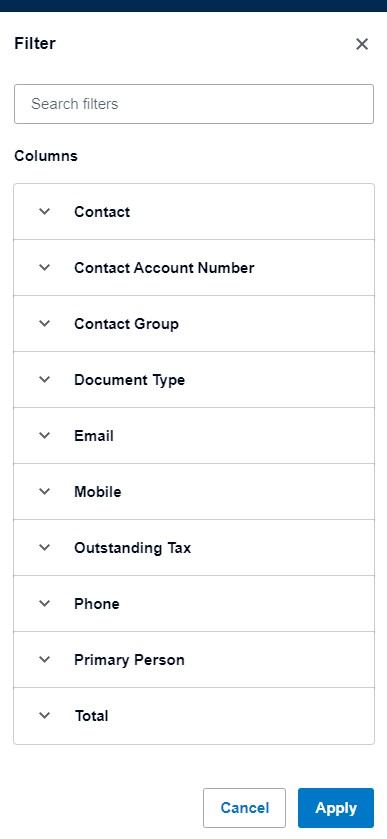
Reports Filter in Xero
Once you have entered this information, click theUpdatebutton to refresh the report.

Aged Payables Summary report options in Xero
When deciding how to pay bills in Xero, you can opt to pay by check or to create a batch payment. To apply payment to a bill from theBillsscreen:
- Step 1:Select theAwaiting Paymenttab.
- Step 2:Select the bill you want to record payment on by clicking the checkbox next to it.
- Step 3:Select theMake Paymentbutton.
- Step 4:Choose a payment method:Pay By CheckorBatch Payment.
Once you have added the bill payment, it’ll move to thePaidtab. If you have recorded a partial payment, the bill will remain on theAwaiting Paymenttab until it’s paid in full. If you have recorded an overpayment, a transaction for the extra amount will move to theAwaiting Paymenttab.
在鑫元鸿导航到付账单
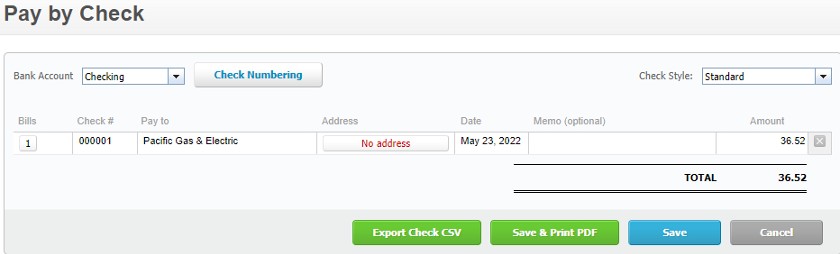
Pay by Check
To record a bill payment by check, enter the following information:
- Bank Account:Select the bank account you want to use to pay these bills.
- Check Numbering:Update the numbering that the checks start with here.
- Check Style:Change the style applied to the check here.
- Bills:The number of bills being paid to the payee appears in this row.
- Check #:This number should populate automatically based on your input in the Check Numbering field above. You can change this field if required. However, you can’t reuse a check number on an uncleared, unreconciled, or voided check from the same bank account.
- Pay to:Change the payee if desired
- Address:If you add or change the payee’s address, this will also update the contact’s mailing address.
- Date:You can change this date to one in the past or future.
- Memo:Add, edit, or delete a note to display on the check and voucher.
- Amount:You can change the amount to less than the bill amount if you aren’t paying the full amount.
Once the above information has been entered, select from the following options to record a bill payment by check:
- Export Checks CSV:Export the check information to a CSV file so you can import it and print it.
- Save & Print PDF:Save the check details and print it to a PDF file. Before printing the checks, you’ll need to change the page scaling to none to print the preprinted check vouchers.
- Save:You can also save the check details without creating a PDF. Print the checks from Xero later or record them in your checkbook or other check printing software.
- Cancel:This cancels the transaction
Recording a bill payment by check in Xero
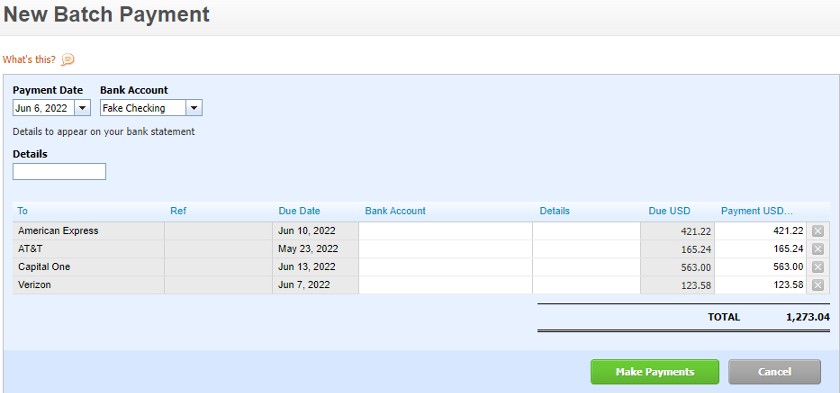
Batch Payment
If you’re looking for a useful solution for how to pay bills in Xero, a batch payment lets you bundle several Xero bills together into one transaction for payment. Once you have batched your payments, you can choose to export the file and upload it into your online banking or other payment service.
To enter a batch payment into Xero, complete the following information:
- Payment Date:This is the date that payment will be generated.
- Bank Account:选择银行账户的账单将派d from.
- Details:Enter any details about the payment here, which will also appear on your bank statement.
Verify that the bills to be paid are correct and selectMake Paymentsto enter a batch payment in Xero.
Entering a batch payment in Xero
Once you have entered a bill in Xero, you may need to edit certain information, void a bill, or delete the bill altogether. To perform these actions, navigate to theBillssection:
- Step 1:Click onBusinessin the top menu bar, then selectBills to pay.
- Step 2:Click on the bill that you want to manage.
- Step 3:Click on theBill Optionsdrop-down menu in the upper right of the screen and select the desired option.
Managing bills in Xero
Edit a Bill
- Step 1:Find and open yourDraft,Awaiting Approval, orAwaiting Paymentbill.
- Step 2:Make your changes to the bill, as shown below. You can edit any field (except the tax amount) and drag and drop line items to reorder them.
- Step 3:一旦你有了finished editing the bill, click theUpdatebutton.
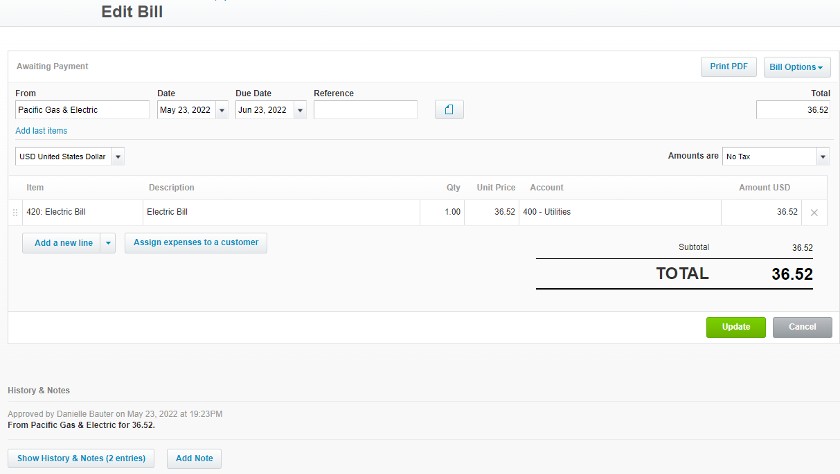
Editing a bill in Xero
Void a Bill
You can’t void awaiting payment or paid bills in bulk, so you’ll need to void them individually. Be sure to remove any payments, credit notes, prepayments, and overpayments before voiding it.
- Step 1:Find and open your awaiting payment or paid bill.
- Step 2:ClickBill Optionsand selectVoid.
- Step 3:In theConfirmwindow, clickOKto void the bill.

Voiding a bill in Xero
删除a Bill
- Step 1:Click onBusinessin the top menu bar.
- Step 2:SelectBills to pay.
- Step 3:Click on theDraftorAwaiting Approvaltab and select your bill by clicking the checkbox next to it.
- Step 4:Click on the删除button, then clickOKin theConfirmpop-up.
Deleting a bill in Xero
Bottom Line
You have now learned how to manage and track unpaid bills in Xero. The next tutorial in our Xero course is How to Add, Reconcile & Delete Your Bank Accounts. It will look at connecting your bank account, reconciling your account with and without a bank feed, viewing your bank reconciliation summary report, and deleting a bank feed that’s no longer needed. You can learn more about all the features offered in ourreview of Xero.